

This handbook is for everyone who runs a club, a choir, an initiative or a hobby group in DettingenConnect. It explains step by step how to start your organisation, take on members, create events with a room and keep track of bookings and payments. You don't need any technical knowledge. Just read the chapter you need right now.
1. Before you start
How the app is laid out
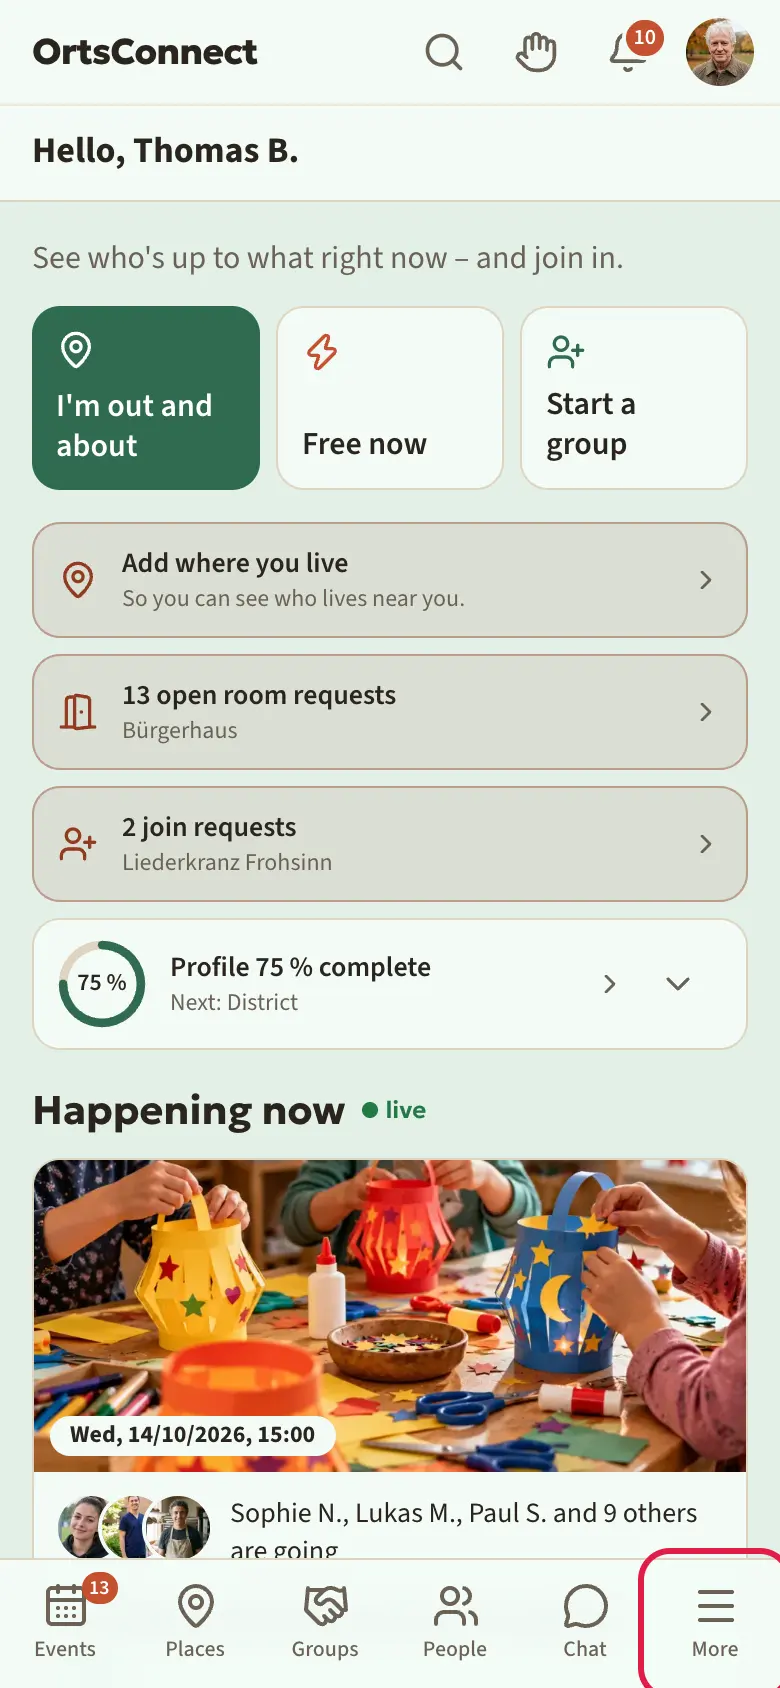
At the very top you always see the same header: the logo on the left (tapping it takes you to Home), next to it search, the bell for notifications and on the right your photo (the avatar). Below it is the page header with the name of the page. To its left there's an arrow that takes you back one page. On the right of the page header there are sometimes small symbols for actions on this page, for example sharing.
At the bottom of the screen is the bar with Events, Places, Groups, People, Chat and More. On a computer, the same appears in a bar on the left-hand edge.
Organisations are listed in three directories:
- Groups (in the bar at the bottom): hobby groups, i.e. people who meet up and do things together, for example a running club or a games night.
- More › Clubs: clubs, initiatives and other organisations, sorted by area.
- More › Businesses: shops, restaurants, service providers and the council.
Where you're involved yourself is shown at the top of the home page under My organisations. Under Groups, the Mine tab also shows everything you belong to, including your club.
What organisers can do
Every organisation has three roles:
- Member: reads posts, writes in the group chat, books events, uploads photos.
- Moderator: like a member, but can also delete posts, tidy up the group chat and approve photos.
- Organiser: can do everything. Create and change events, book rooms, take on and remove members, assign roles, change settings.
An organisation always has at least one organiser. But two or three of you can also run it together.
The ‘Manage’ button
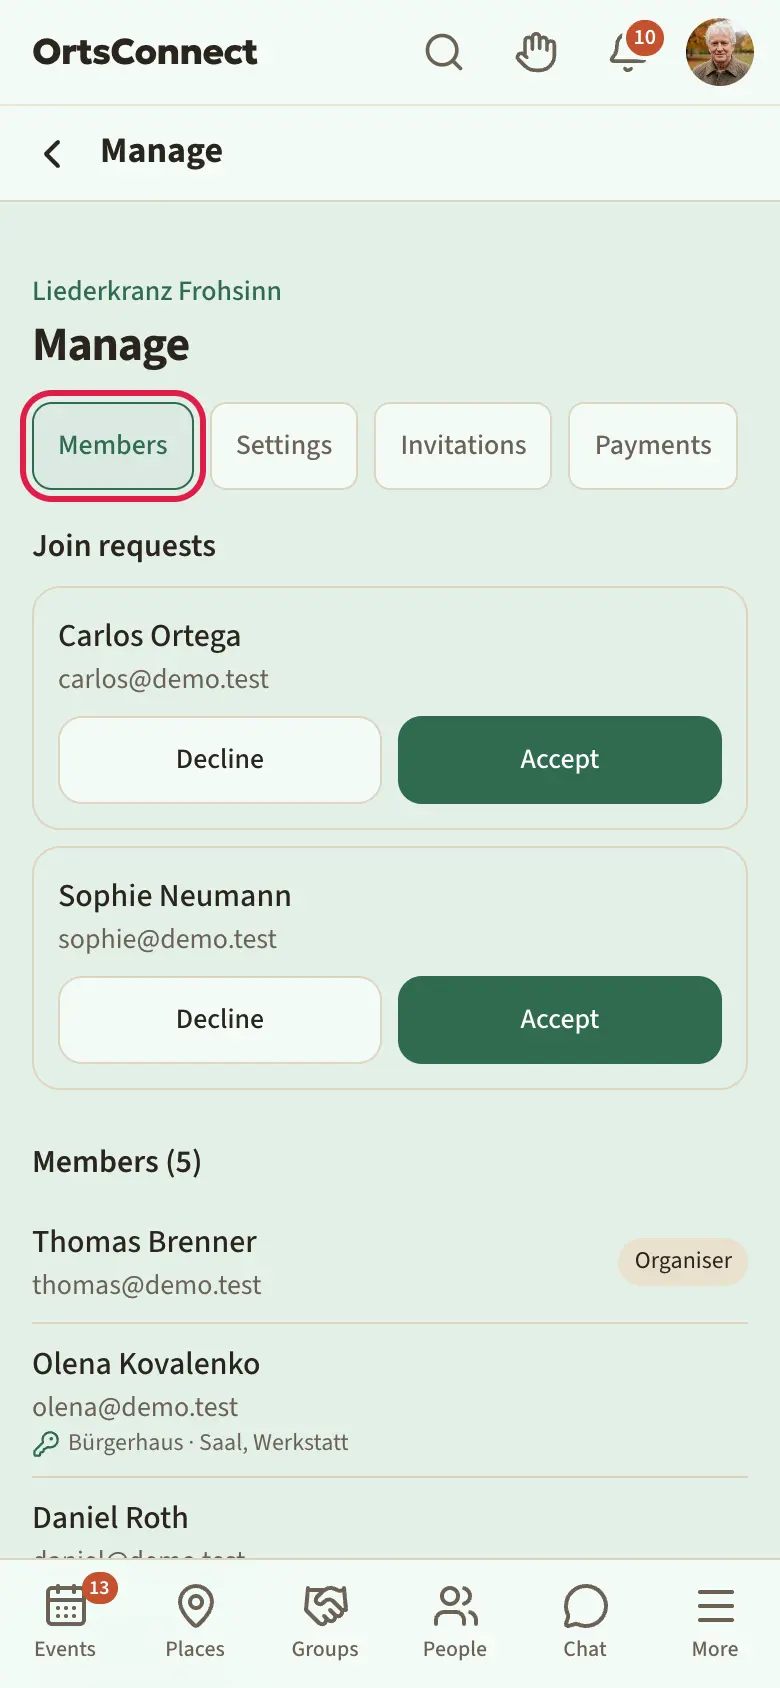
As an organiser, you'll see the Manage button at the top of your organisation's page. Behind it are four sections: Members (Team for businesses), Settings, Invitations and Payments. You choose these sections using tabs at the top. If you run a place, there's also the At our places tab (chapter 4).
If you've allowed a member the Manage payments task (chapter 4), they see the Payments button in this spot instead of Manage. It takes them straight to your organisation's payments page.
Tip: Protect your account further with Two-factor sign-in. You'll find it in your settings under Security. Then, when you sign in, you need a code from an authenticator app as well as your password. It's optional, but highly recommended for organisers.
2. Starting an organisation
Group or club?
Where you start depends on what you are:
- A Group is people who meet up and do things together, for example a running club or a knitting circle. You start it at the bottom under Groups with the round Start a group button at the bottom right. Start a group is also on the home page.
- You add a Club, an Initiative or something else established under More › Clubs with the round Add a club button at the bottom right.
- You add a Business under More › Businesses. How that works is explained in the Handbook for places and businesses.
Step by step
- Tap Start a group or Add a club.
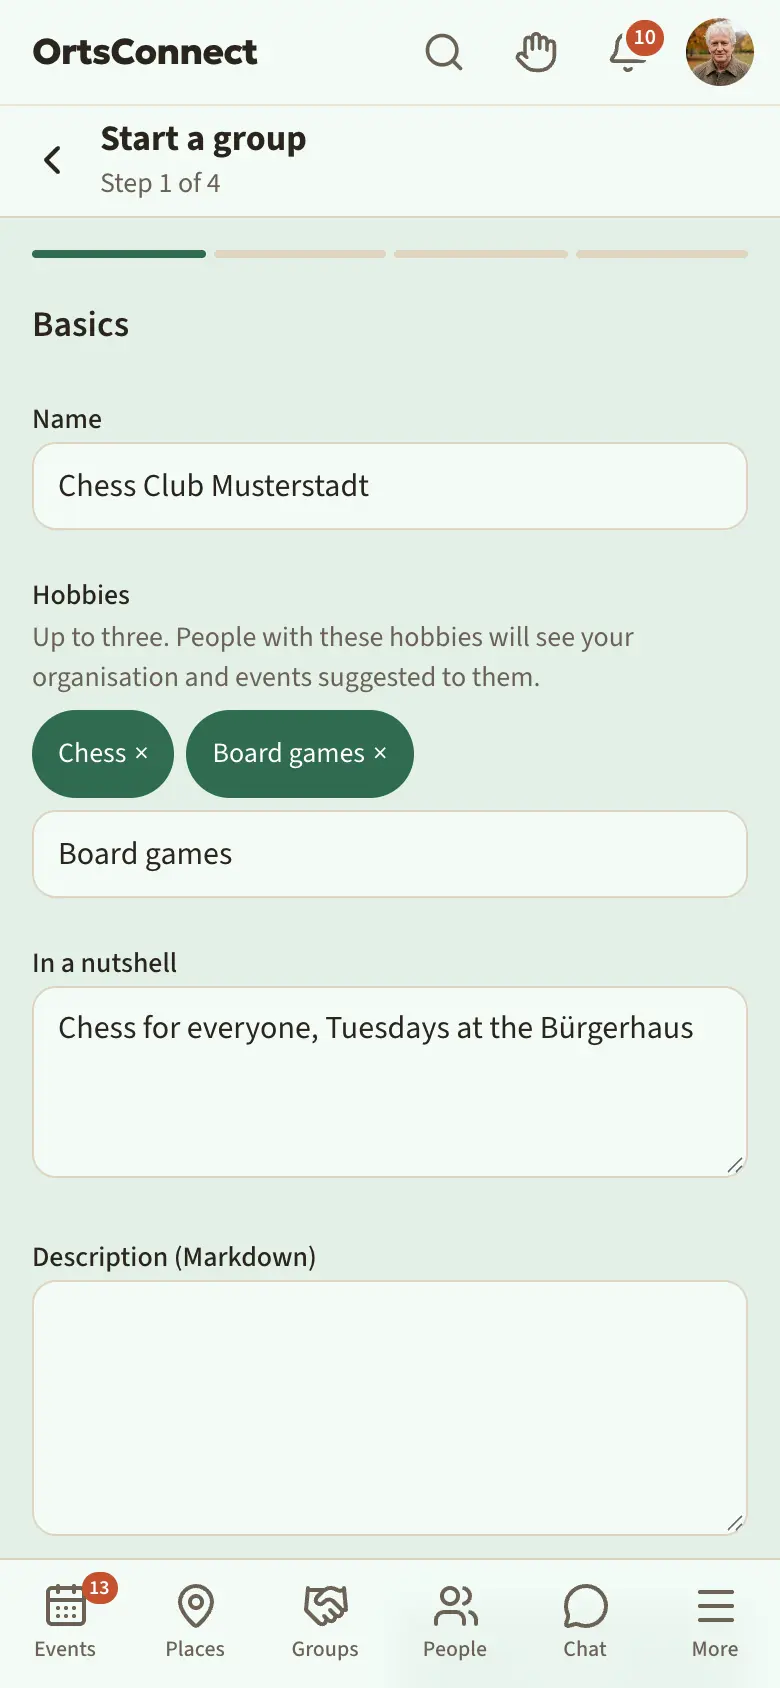
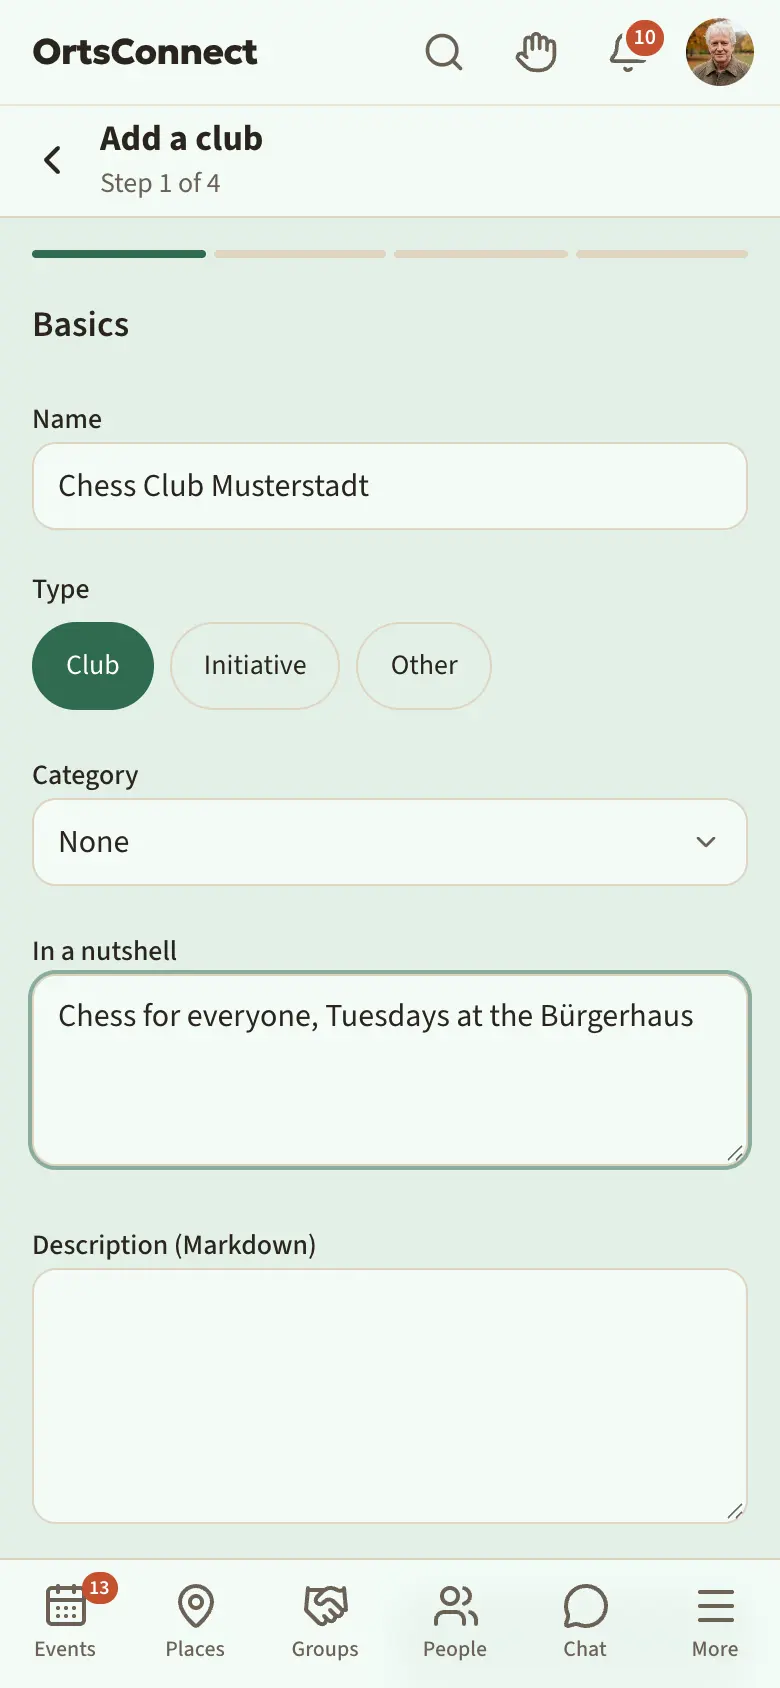
- The wizard has four steps. At the top you can see where you are (‘Step 1 of 4’).
- Basics: enter the Name.
- For a Group, choose up to three suitable hobbies under Hobbies. To do this, type two or more letters into the Search hobbies … field and tap a suggestion.
- For a Club, choose the Type (Club, Initiative or Other) and a Category, for example Sport or Music.
- Write one sentence that describes you in In a nutshell. Description (Markdown) has room for more text.
- Tap Next.
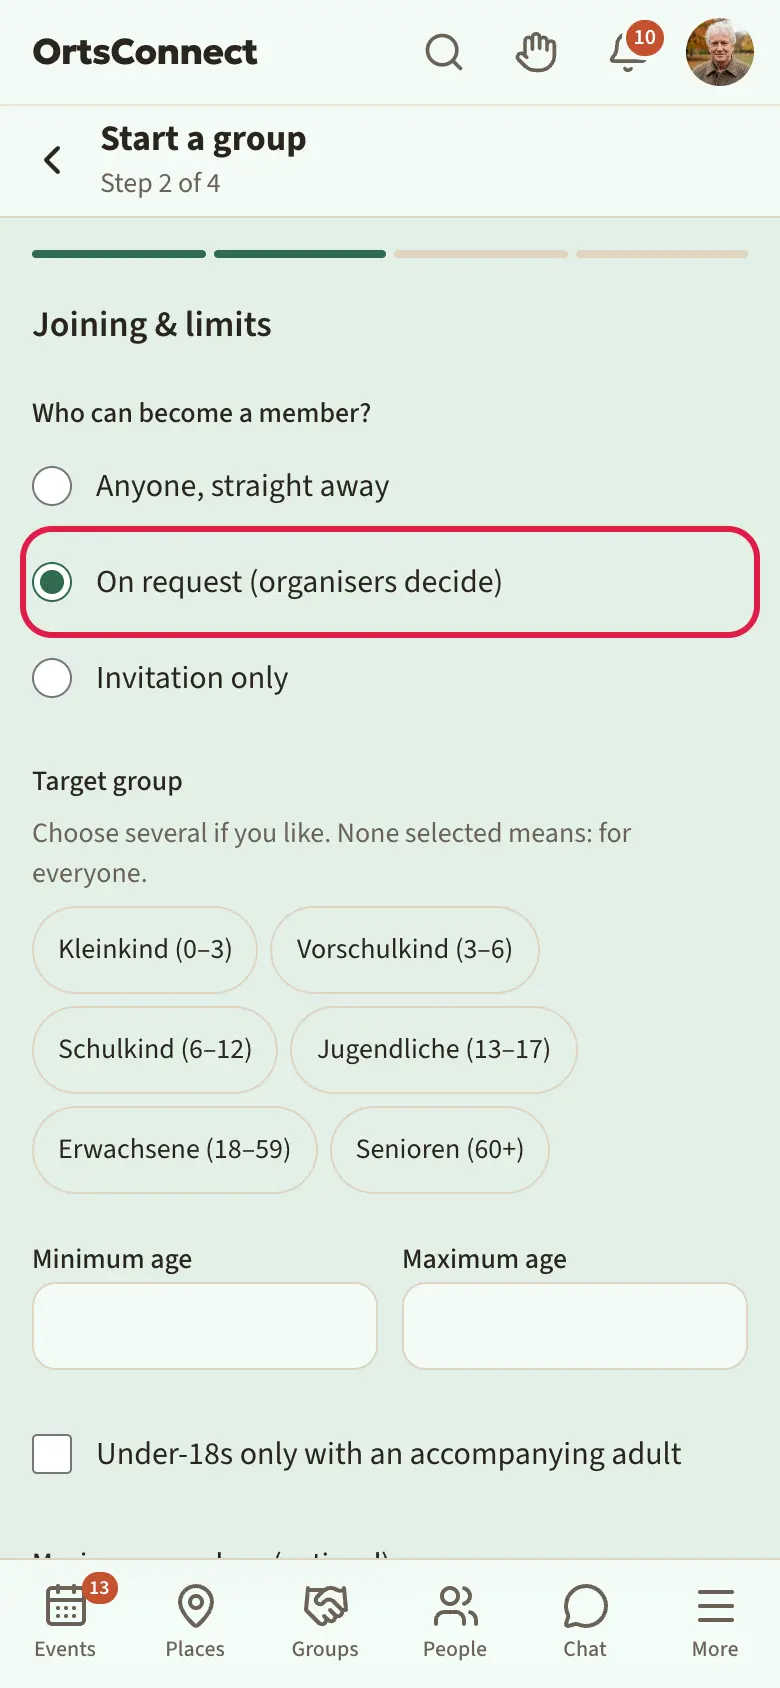
- Joining & limits: decide Who can become a member? (more on this below). If you're only there for certain age groups, choose one or more groups under Target group (for example young people, adults and seniors) or enter a Minimum age and Maximum age. If needed, tick Under-18s only with an accompanying adult. Under Maximum members (optional) you can set a limit. Give a Contact email (optional) if you want people to be able to reach you.
- Tap Next.
- Image: for Cover image and for Logo, tap Choose image and pick a photo.
- Tap Next.
- Review: look at the summary. With Back you can still change something.
- Tap Create (for a group) or Add (for a club).
Good to know: The app remembers what you enter in the wizard on your device. If you stop part-way through, everything is still there the next time you open it.
Who can become a member?
For a Club, a Business and the Council there's no such choice: anyone who taps I'm a member or I work here there only belongs once you confirm it. That way nobody appears as a member or in the team on their profile without being asked.
For groups, initiatives and others (Join in button) there are three options:
- Anyone, straight away: anyone who taps Join in is in straight away.
- On request (organisers decide): people who are interested tap Join in. You get a notification and accept or decline the request.
- Invitation only: nobody can join by themselves. You invite people by link (see chapter 4). Under Note for those interested (optional) you can explain how people can still join, for example ‘Talk to us at rehearsal’.
You can change this setting at any time later.
Approval
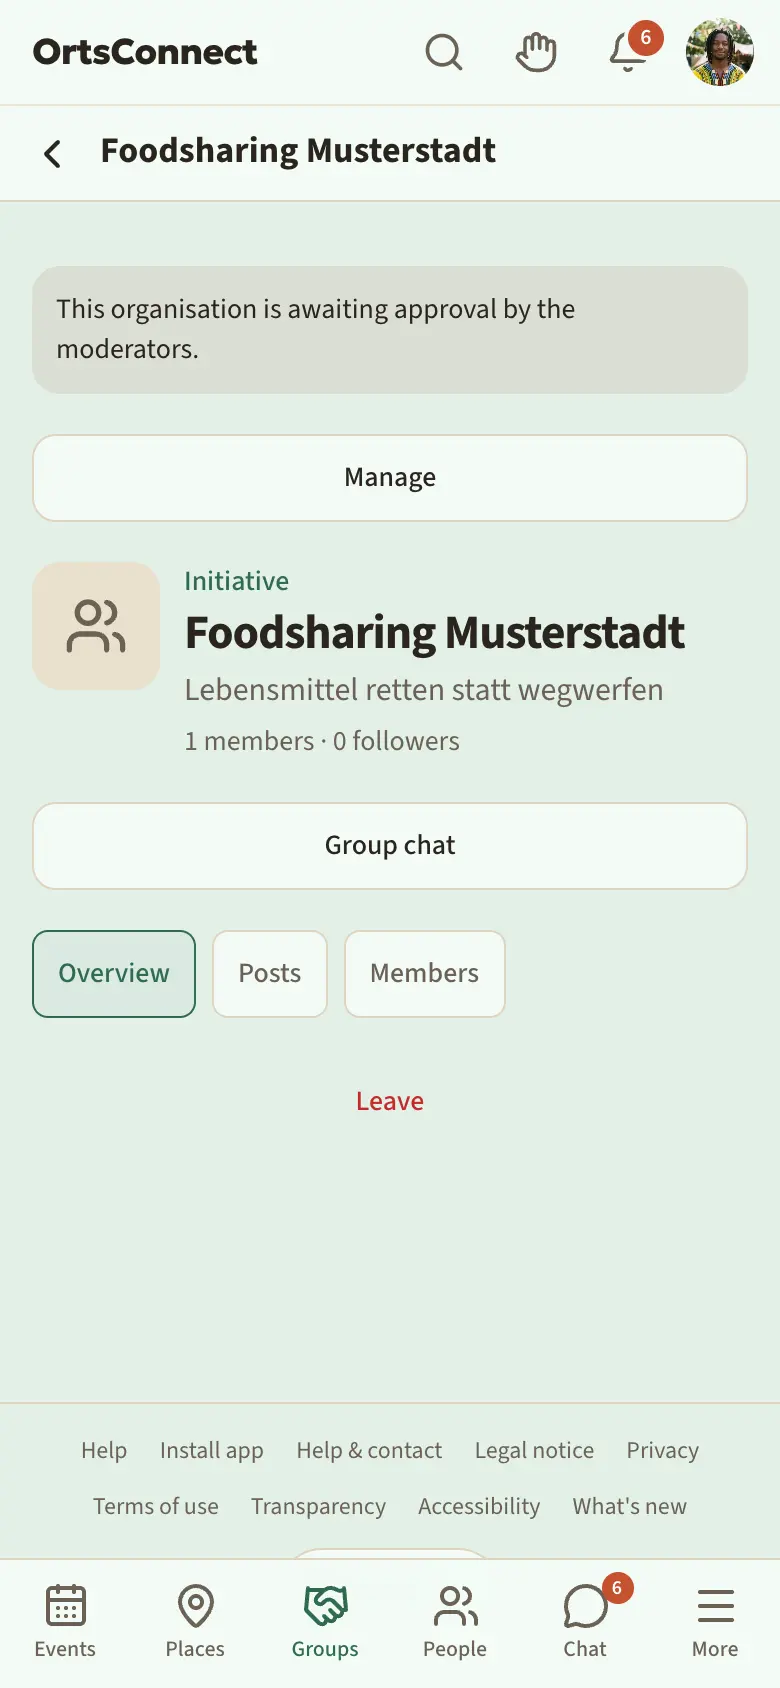
After starting it, you're the organiser straight away. But the organisation isn't visible to everyone yet. Your community's moderators check it first. Until then the page says: ‘This organisation is awaiting approval by the moderators.’
As soon as the moderators approve it, you get the notification Organisation approved. From then on, everyone can see your page, follow you and join.
If the organisation is rejected, you'll also be told, usually with a reason. You'll also see the reason on the organisation's page.
Good to know: You can only create events once your organisation has been approved.
3. Setting up your organisation
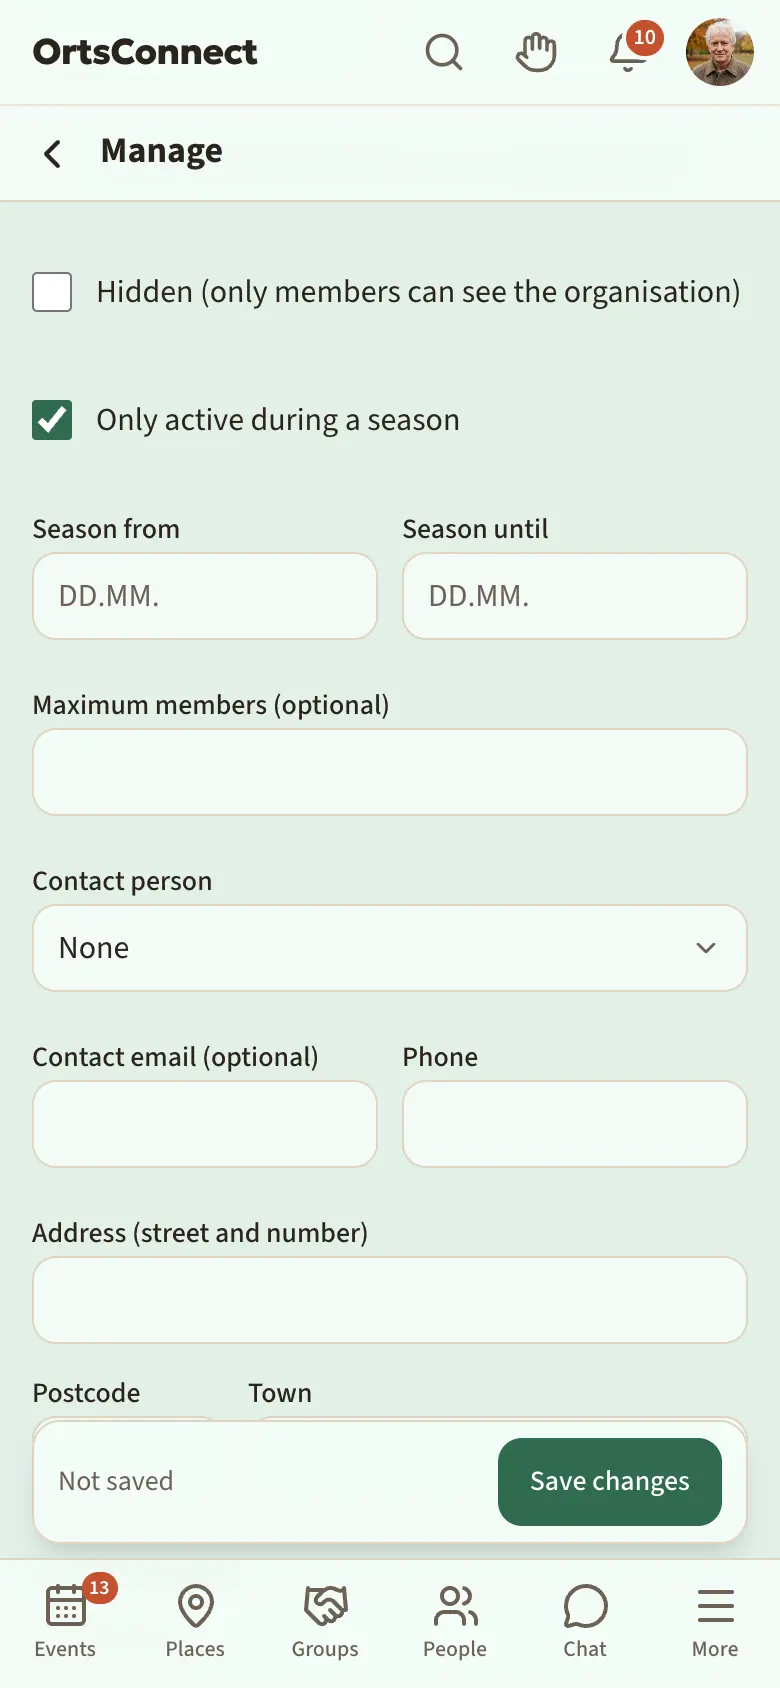
You change all the details of your organisation under Manage › Settings. The page is long. Take your time scrolling down. As soon as you've changed something, the Not saved bar with the Save changes button appears at the bottom edge. Tap it when you're done. If you want to leave the page before that, the app asks you first.
Name, description and hobbies
- Open Manage › Settings.
- If needed, change Name, Type, Category (Sector for businesses) and In a nutshell.
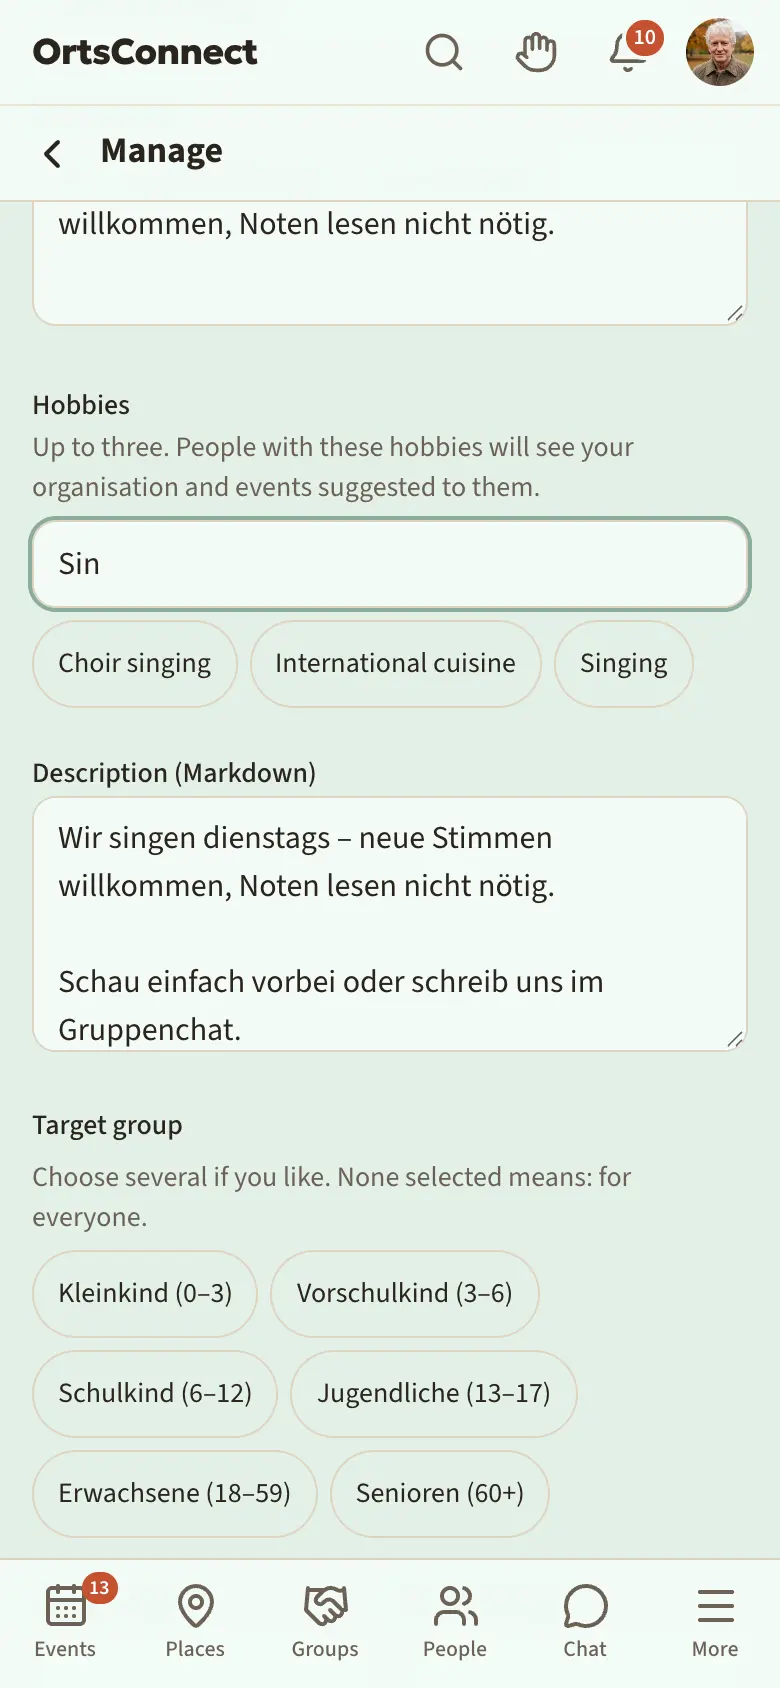
- Under Hobbies, choose up to three suitable hobbies. To do this, type two or more letters into the Search hobbies … field and tap a suggestion. You remove a chosen hobby by tapping it again.
- In Description (Markdown), write who you are, when you meet and what people should bring.
- Tap Save changes.
Tip: The hobbies are important. People who have these hobbies in their profile get your organisation and your events suggested to them.
Sections: a group belongs to a club
A group can belong to a club, for example the handball group to the sports club. It remains a group of its own with its own chat and its own events.
As the group's organiser:
- Open Manage › Settings.
- Under Part of club, choose the club.
- Tap Save changes.
Below it says ‘Waiting for the club to confirm.’ until the club's organisers agree. If you run both, the link applies straight away. With Not part of a club you remove it again.
As the club's organiser you get the notification New section requested. Here's how to decide:
- Open Manage › Members.
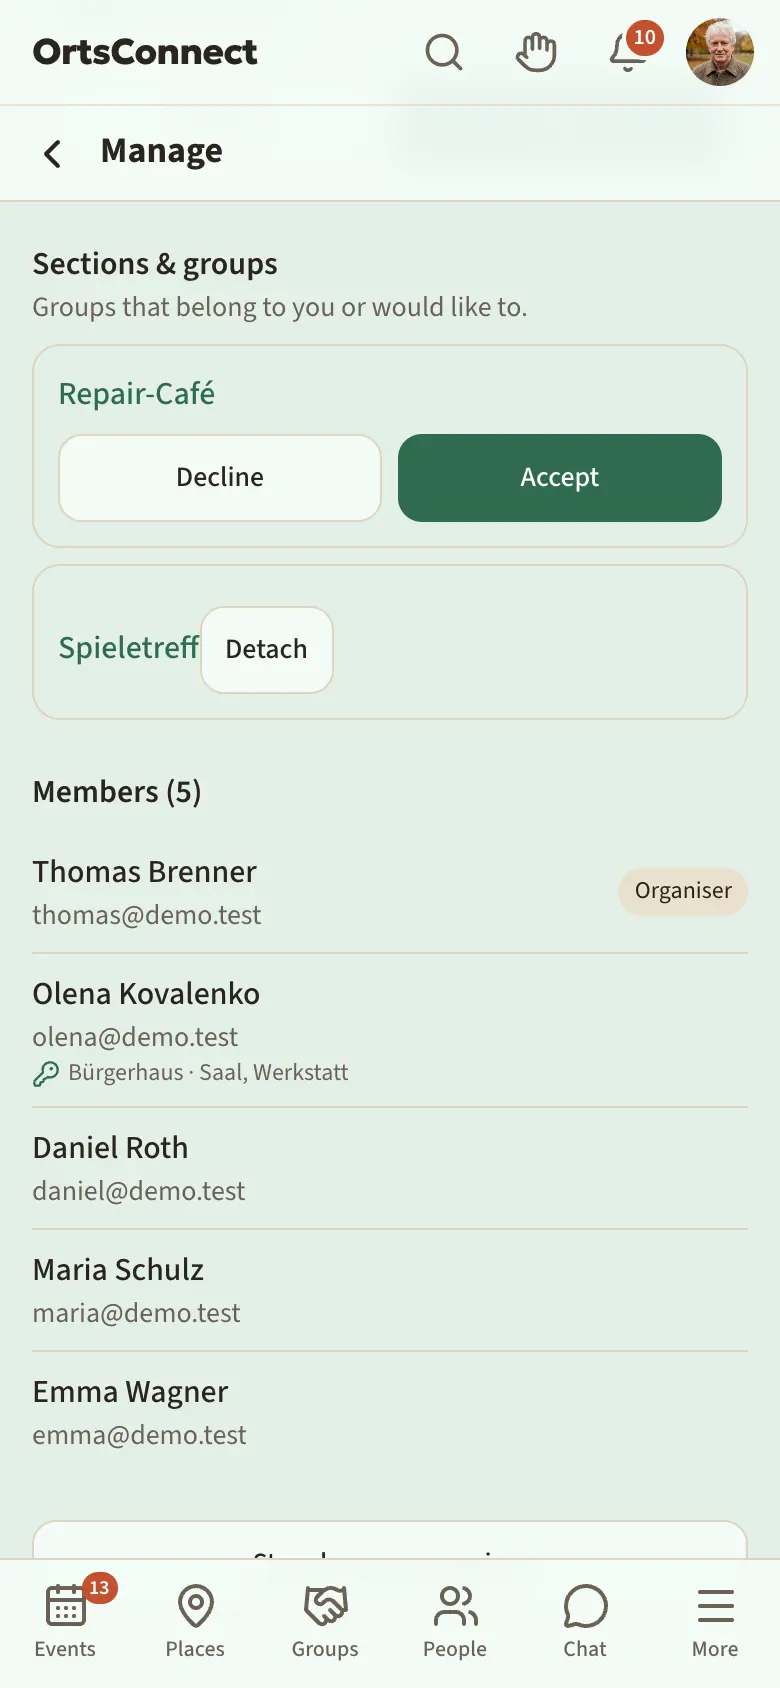
- The group is listed under Sections & groups. Tap Accept or Decline.
Confirmed groups appear on your club page under Sections & groups, and the group shows ‘Part of’ with your name. With Detach you take a group out again.
Joining, age and visibility
Here you'll find the same details as when starting: Who can become a member?, Target group, Minimum age, Maximum age, Under-18s only with an accompanying adult and Maximum members (optional).
What's new is the Hidden (only members can see the organisation) tick box. Then your organisation doesn't appear in the list. Only members can see it. New people then join via an invitation link.
Season and seasonal break
Some groups are only active for part of the year, for example an outdoor pool team or a winter sports club.
- Tick Only active during a season.
- Under Season from and Season until, enter the day and month in the form DD.MM., for example 01.05. and 30.09.
- Tap Save changes.
Outside the season, your page shows the note ‘Seasonal break until …’. Your organisation stays visible all the same, and people can still join.
Contact
Under Contact person, choose someone from your organisers who is shown on your page as the contact. Enter a Contact email (optional) and a Phone number if you want people to be able to reach you. Clubs and groups can also give their Address (street and number) with Postcode and Town; businesses maintain their location instead. Under Contact visible to, choose everyone or only Members.
Defaults for events
In the Events section you decide how new events start. That saves a lot of typing later.
- New events public by default: new events are visible to everyone. The wizard (chapter 6) then starts with the visibility Public. If you untick it, it starts with Signed-in users: then everyone who is signed in to DettingenConnect sees your events, including people with matching hobbies who aren't members yet. The same applies to quick add. You choose Organisation members only by hand for an individual event.
- Default room for quick add: the room where you usually meet. It's already selected for quick add. On the place's page, your organisation then appears under Meet here. The other way round, your page shows the Meeting point under Overview; signed-in users see there who's there right now or comes often, and can add themselves with I'm here now or I'm often here.
- Default duration (minutes): how long your meetings usually last, for example 90. The end time is then filled in automatically.
Links
Under Links you can add, for example, your own website.
- Tap Add.
- Enter a Label, for example ‘Our website’.
- Enter the address next to it. It starts with https://.
- Tap Save changes.
You remove a link with the bin symbol next to it.
Cover photo and logo
Below the first part you'll find the Cover image and Logo sections. Tap the upload field and choose a photo. The image is applied straight away; you don't need to save separately.
Tip: The cover image also appears as a preview when someone shares your page by messenger. A friendly group photo works best here.
Rules
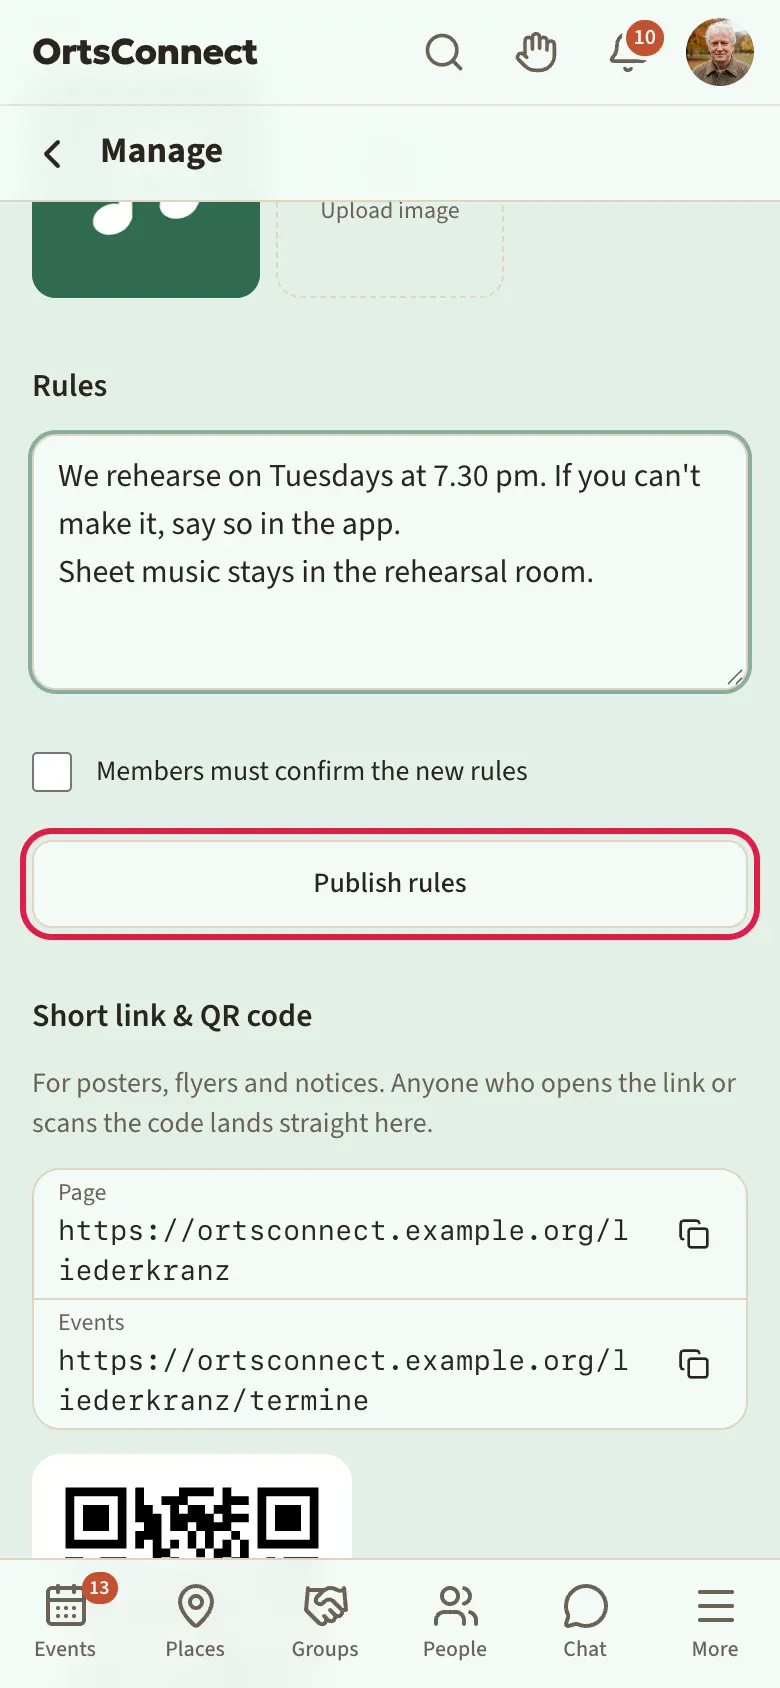
If your organisation has rules, for example house rules or notes on training, write them down under Rules.
- Write the rules in the text field.
- If all members should confirm the new rules again, tick Members must confirm the new rules.
- Tap Publish rules.
Every change gets a new version number. Anyone joining has to read and confirm the rules first. If you've ticked the box, all members see the note ‘The rules have changed. Please confirm them.’ and the Confirm rules button on your page.
Good to know: For small corrections, such as a typo, just leave the box unticked. The new rules then count as confirmed for everyone.
Short link and QR code
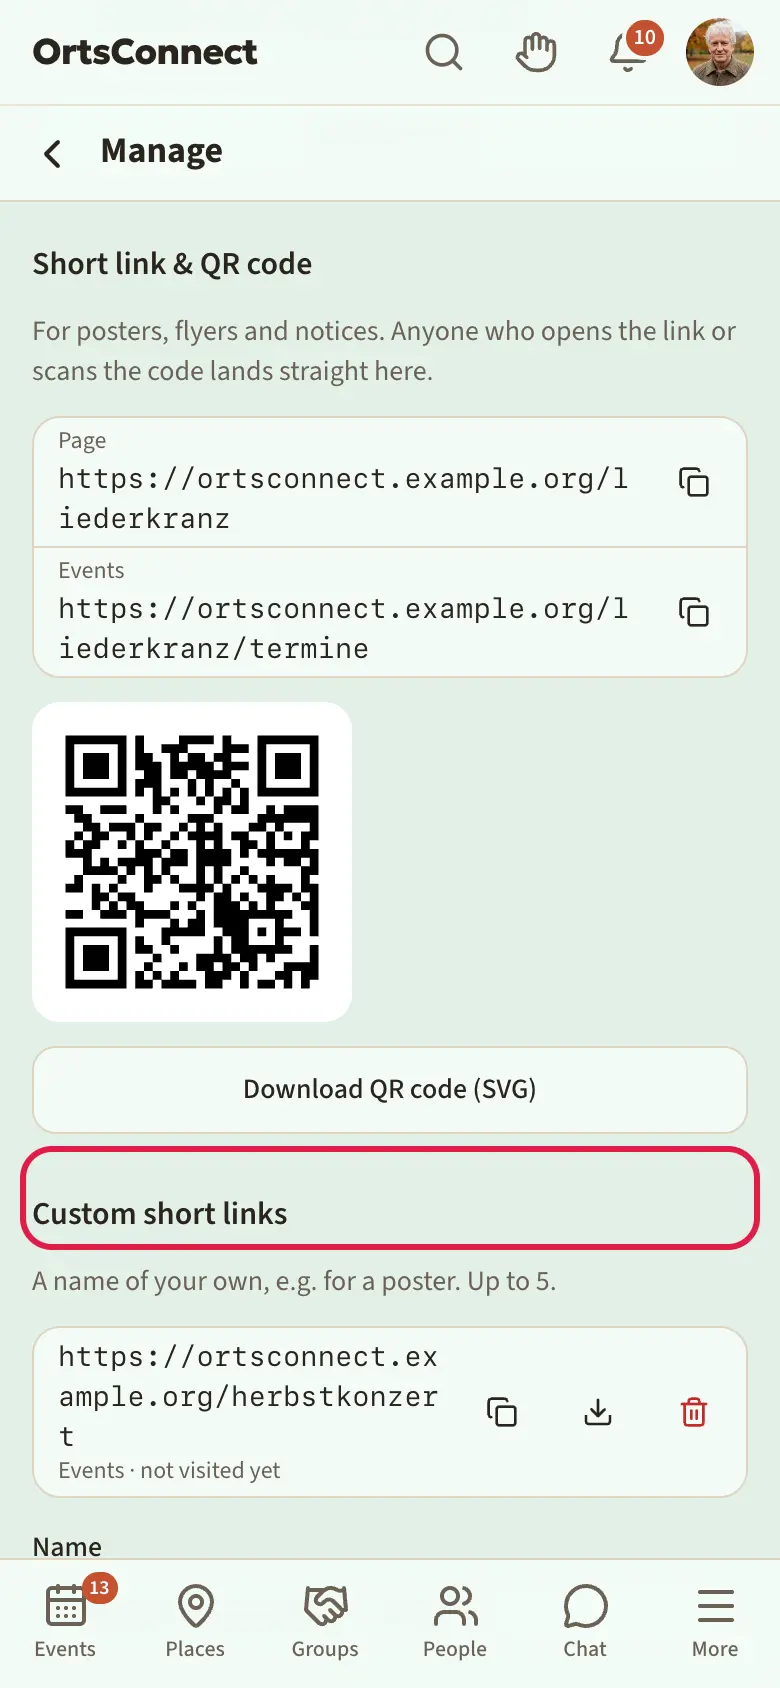
Under Short link & QR code you'll find short addresses and a QR code for your page. This is handy for posters, flyers and notices:
- Page: the short address of your page, for example
…/liederkranz. - Events: the same address with
/termineat the end. It goes straight to your events.
Tap Download QR code (SVG) to save the code and, for example, put it into a flyer. The Share button on your page also sends the short address.
Custom short links: for a poster you can reserve up to five names of your own, for example …/herbstkonzert. Enter the name, choose whether it leads to the Page or to the Events, and tap Create short link. Lower-case letters, digits and hyphens are allowed. If a name is already taken, the app tells you. For each custom short link you see how often it has been visited and can download the QR code for it.
4. Managing members
Accepting or declining join requests
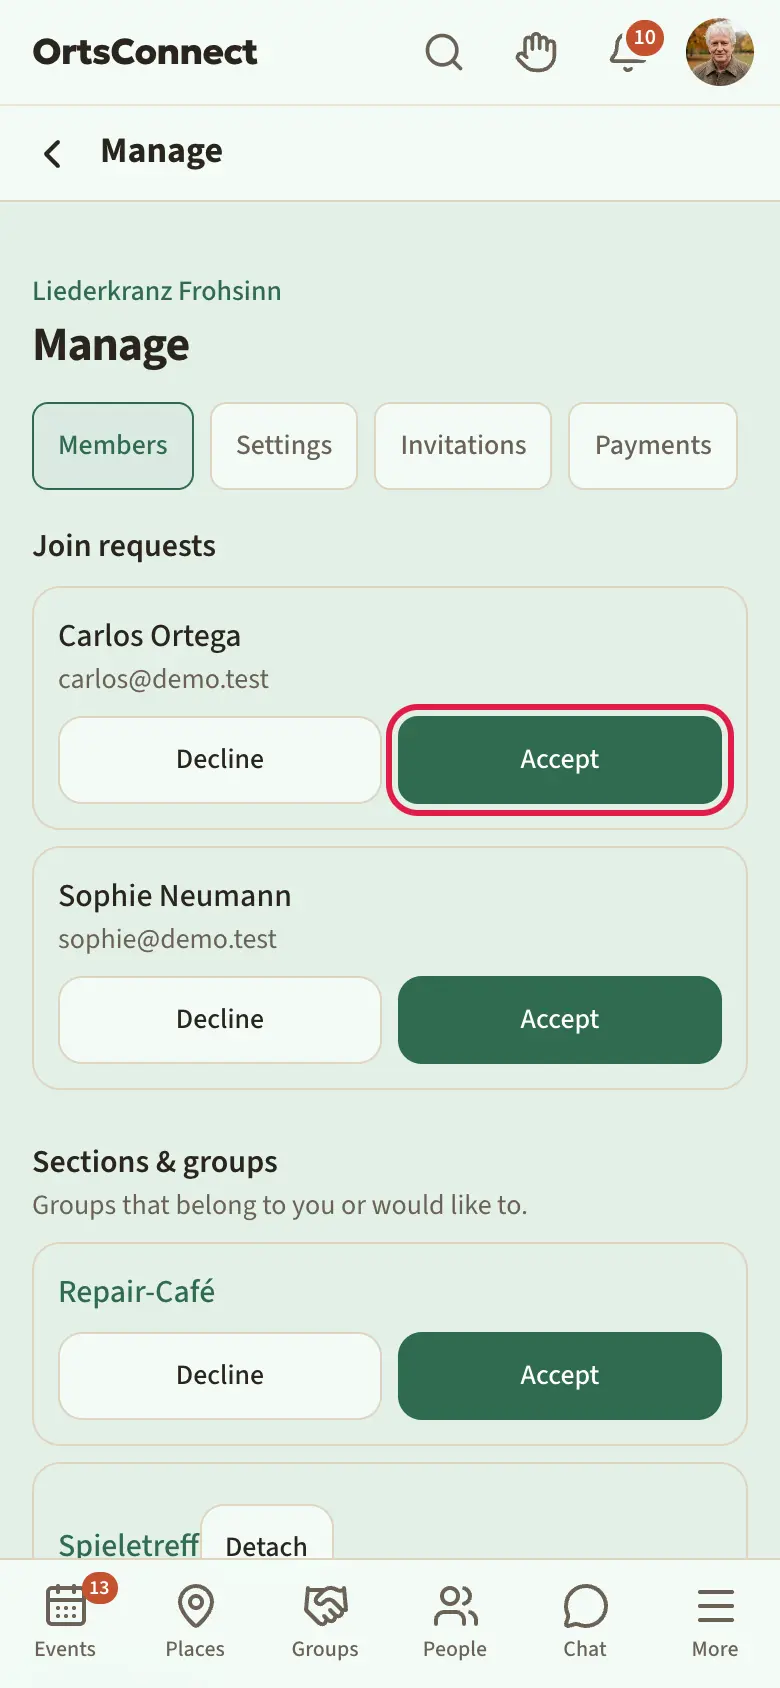
If you've set On request (organisers decide) (always the case for clubs, businesses and the council), you get the notification New join request for every request. A tile on the home page also shows you how many requests are open.
- Open Manage › Members.
- The Join requests are at the very top with name and email address.
- Tap Accept or Decline.
Anyone accepted gets a welcome message.
Assigning roles
- Open Manage › Members.
- Tap the person's name.
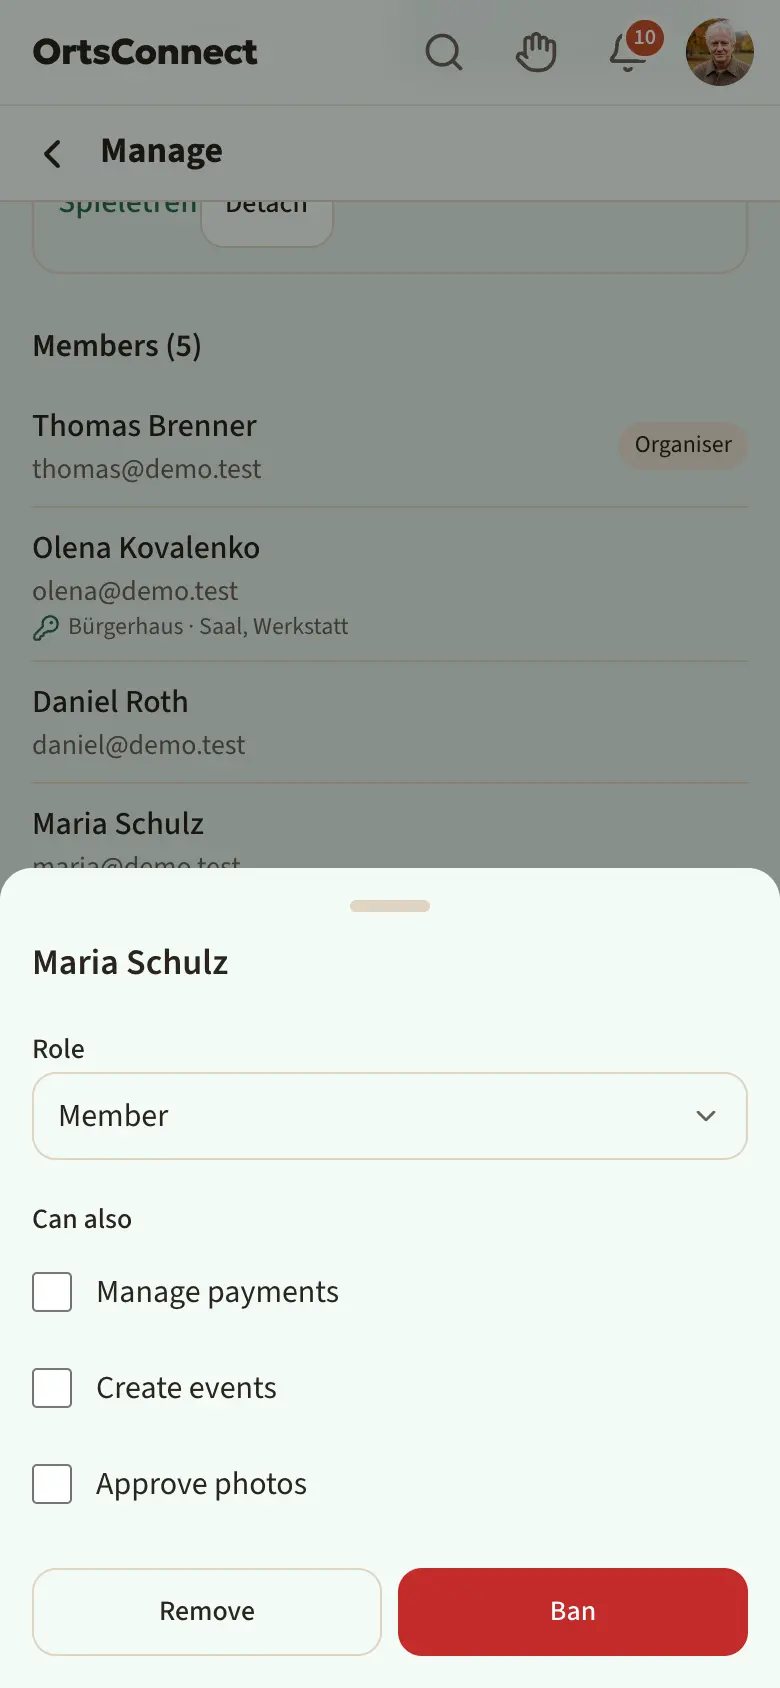
- A window opens at the bottom. Under Role, choose Member, Moderator or Organiser.
The change applies straight away.
Allowing individual tasks
Not everyone has to be an organiser straight away. Under Can also you can allow a member or a moderator individual tasks. Which switches you see depends on what's switched on in your community. For example:
- Create events: the person may add events. But only organisers may book a room. This person's events therefore have no room, just a place.
- Approve photos: the person looks after the photos at your events.
- Manage payments: the person (for example your treasurer) confirms payments and records refunds. They'll find the Payments button on your page. But only organisers can change bank details and PayPal.
Simply tick or untick the box.
Removing or banning members
- In Manage › Members, tap the name.
- Tap Remove if the person is no longer involved. They can join again later.
- Tap Ban if the person shouldn't join again. Banned people are listed at the bottom under Banned.
Handing over or stepping down as organiser
If someone else is taking over as organiser:
- Give the person the Organiser role (see above).
- After that you can give yourself a different role or Leave on the organisation's page.
If nobody can be found, you can still step down: in Manage › Members, tap Step down as organiser at the very bottom and confirm. You stay a member, but management is closed to you afterwards. The organisation then shows Organisers wanted. Members can volunteer with I'd help organise, and the operator of the app appoints new organisers.
Good to know: As the last organiser, you can't leave directly. Step down as organiser first, then leaving works as it does for everyone. If you want to delete your account, step down as organiser first or delete the organisation.
At our places
If your organisation runs places (for example a community centre), Manage has the At our places tab. For each place it lists which organisations held events with you in the past year or have upcoming ones, with the number of events. Tapping an organisation opens its page, and Events → shows all events at the place.
Inviting a person
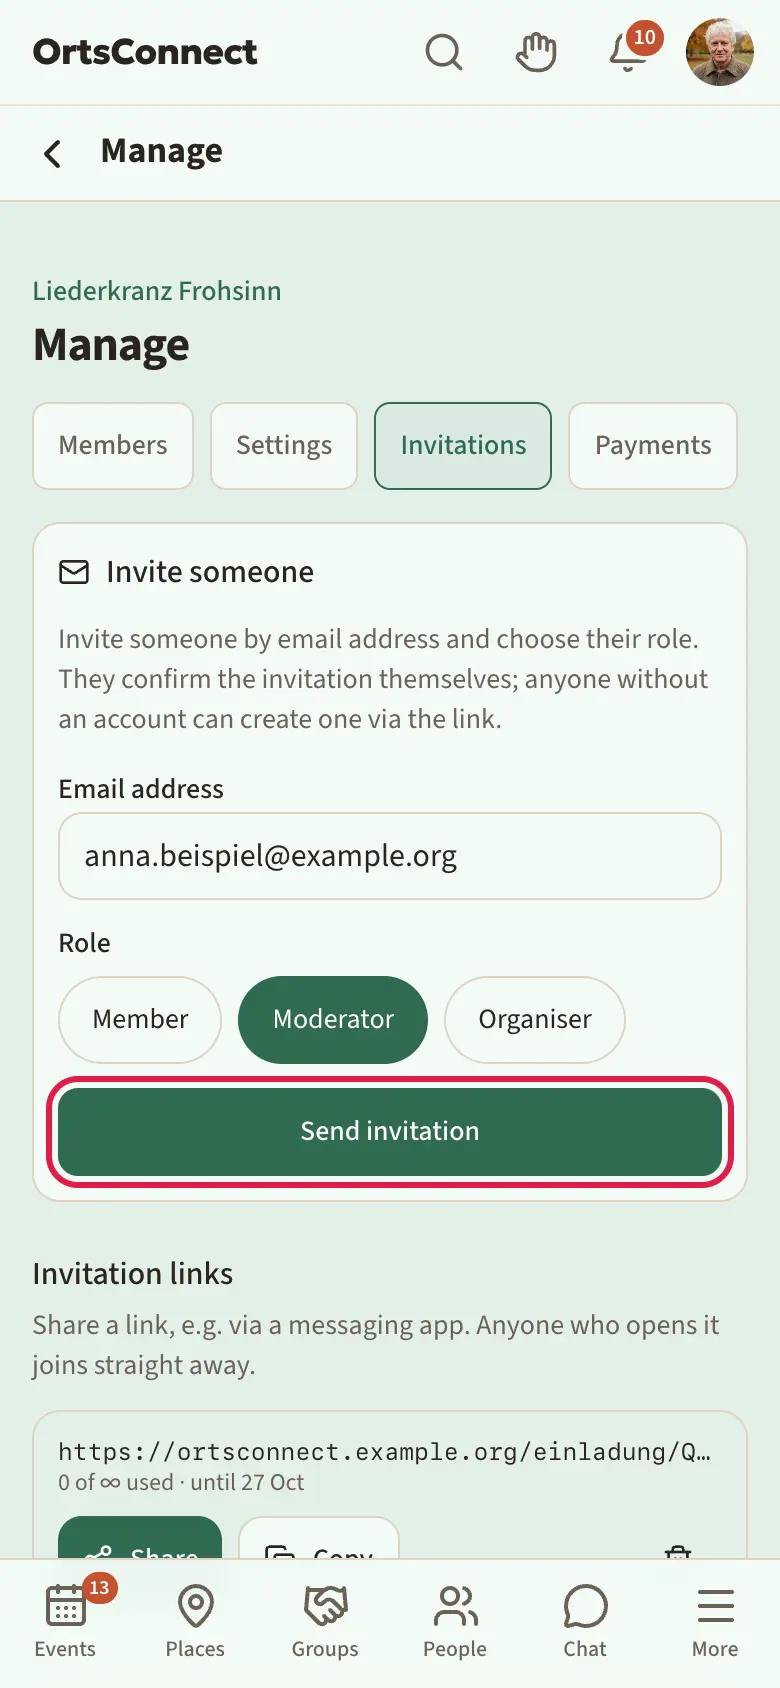
You can invite a specific person and set their role at the same time, for example if someone is to take over as organiser:
- Open Manage › Invitations.
- At the top, under Invite someone, enter the Email address.
- Choose the Role: Member, Moderator or Organiser.
- Tap Send invitation.
If the person already has an account, they get the invitation in the app and, depending on their settings, by email. Otherwise they get an email and create an account via the link. They're only added once they tap Accept invitation themselves; the invitation is valid for 30 days and only for this email address. Under Pending invitations you see who hasn't accepted yet, and you withdraw an invitation using the bin symbol.
Good to know: If the person is already involved, the invitation changes their role as soon as they accept. This way you can also hand over the organiser role to someone who's already a member.
Invitation links
With an invitation link you bring people straight into the organisation, for example via your messenger group. Anyone who opens the link and taps Accept invitation is a member straight away. This also works if you've set Invitation only. The age limits still apply, though.
How to create a link:
- Open Manage › Invitations.
- At the bottom, under Valid (days), enter how long the link should work. The default is 14 days.
- If only a certain number of people should use the link, enter it under Up to (people). Empty means: unlimited.
- Tap Create new link.
- On the new link, tap Share to send it straight away, or Copy.
For each link you see how often it has been used and until when it's valid. You delete a link that should no longer work using the bin symbol (Delete link).
Tip: Anyone who opens the link and doesn't have an account yet is first asked to sign up.
5. Posts and group chat
Posts are announcements
Posts are meant for important announcements from the organisers, for example ‘Summer party on Saturday’ or ‘New training times’. There are no comments under posts. Questions and conversations belong in the group chat.
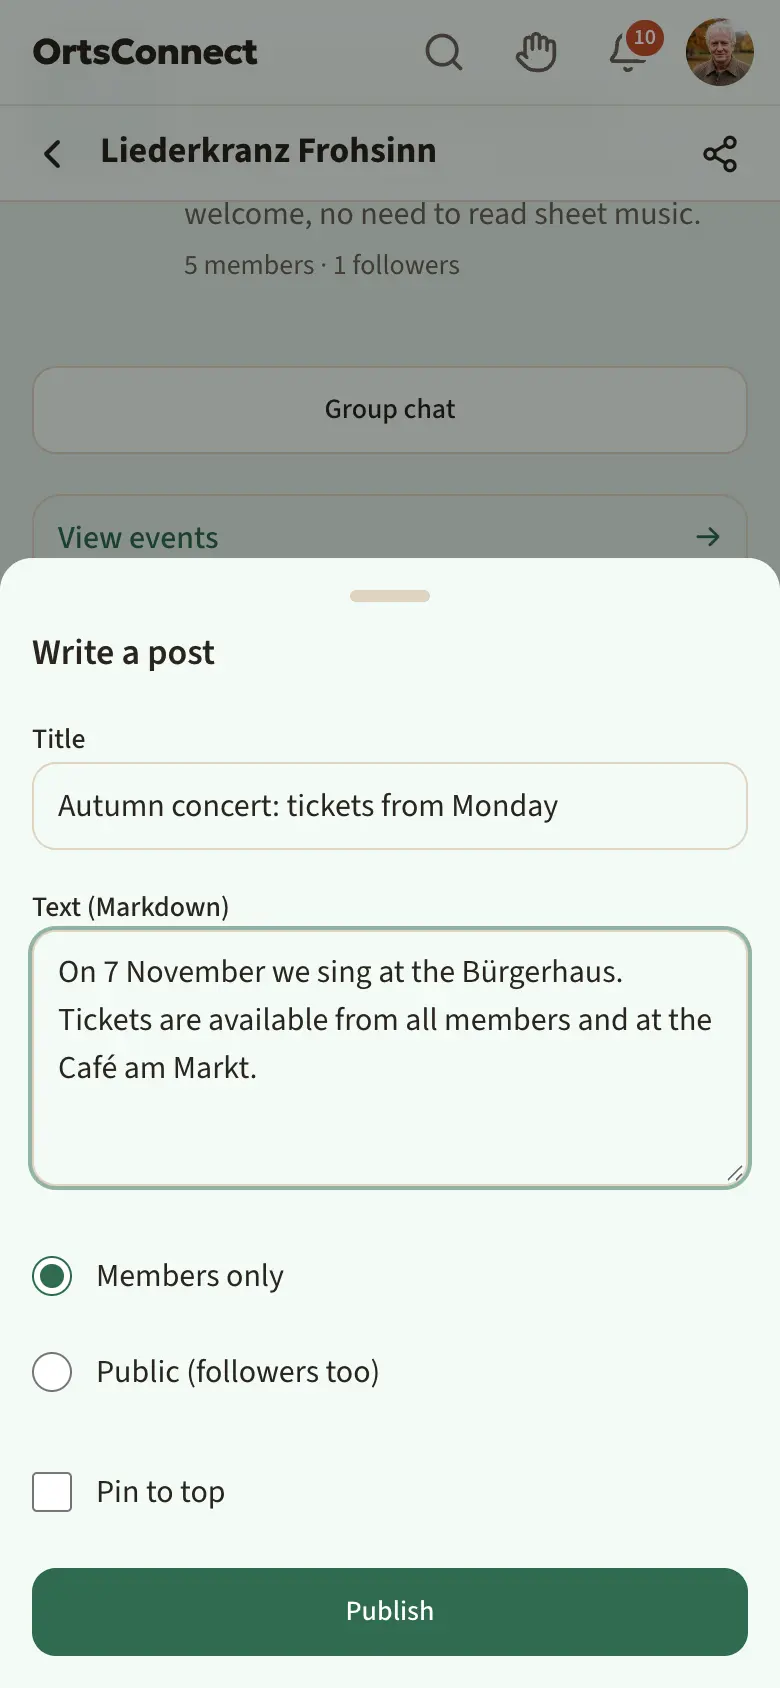
How to write a post:
- Open your organisation's page.
- Tap the Posts tab.
- Tap Write a post.
- Enter a Title and the Text (Markdown).
- Choose who gets the post: Members only or Public (followers too).
- If the post should stay at the top, tick Pin to top.
- Tap Publish.
Members and, for public posts, followers too get a New post notification.
You delete a post with the bin symbol next to the title (Delete post).
The group chat
Every organisation has exactly one group chat. All active members are in it automatically. Anyone who leaves or is removed is out of the chat too.
You open it on your organisation's page via Group chat or in the Chat section at the bottom.
All the actions for a message are shown small in its time line, directly below the text. As organisers and moderators you have a few extra options there and in the chat:
- Pin: in a message's time line, tap Pin. It then appears at the top of the chat in the Pinned bar, for example a note about the meeting place. Tapping the bar jumps to the message, and if there are several, to the next one. With Unpin you take it out again.
- Remove for everyone: you remove other people's disruptive messages via Remove for everyone and confirm. In its place, everyone then sees ‘Removed by the group organisers’.
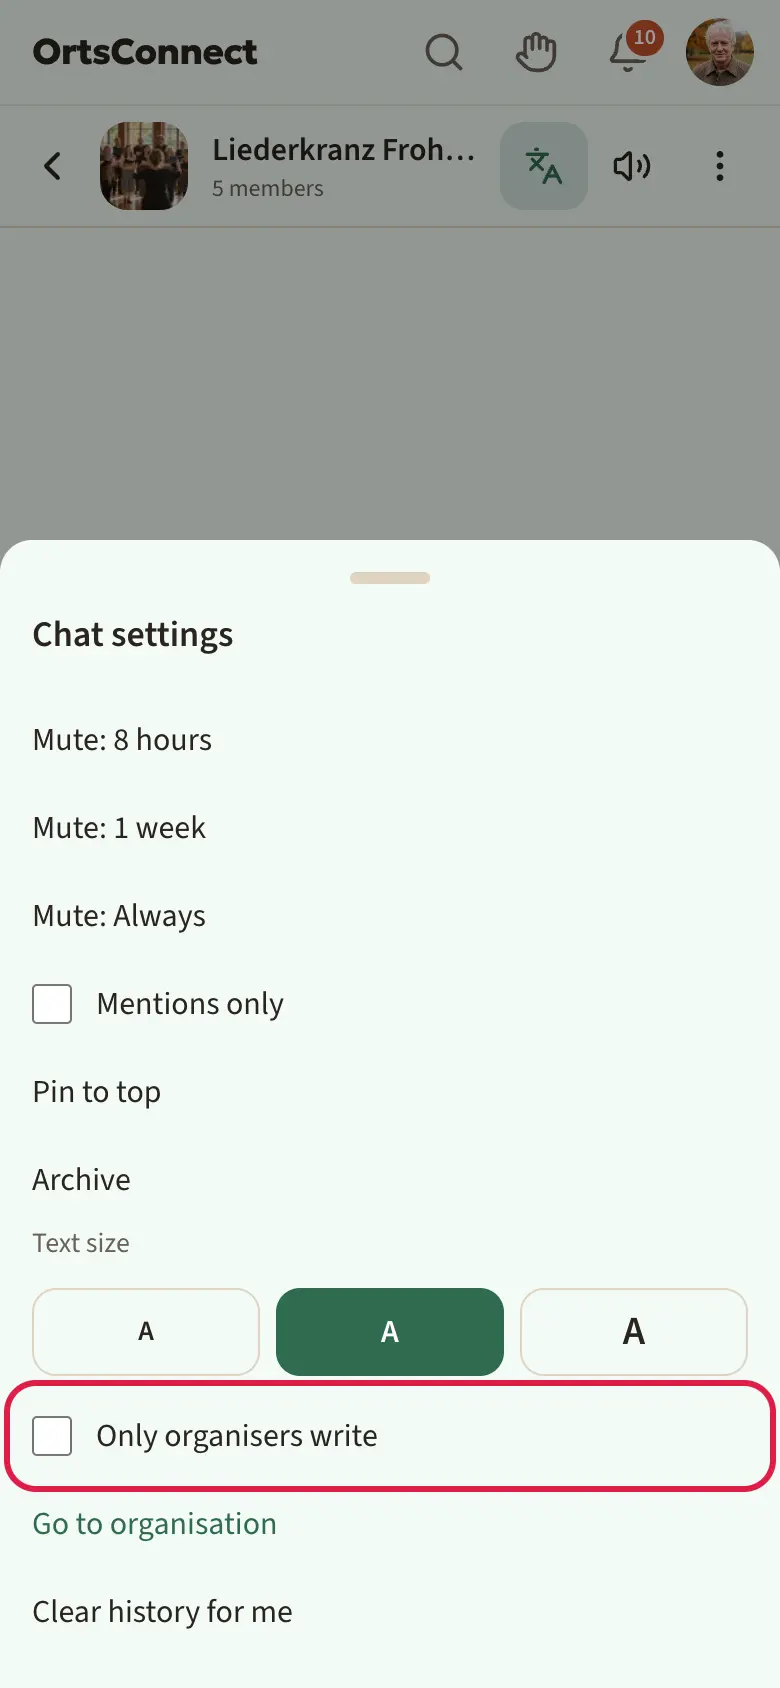
- Only organisers write: open the Chat settings using the symbol at the top and tick Only organisers write. Then only organisers and moderators can write, and everyone else reads along. This is suitable for pure information channels.
Good to know: You can only Edit or Retract your own messages as long as nobody has read them yet. After that they stay; you can only hide them for yourself with Delete for me. So think announcements through before sending them.
How members write in the chat, send photos and set up notifications is explained in the Handbook for members.
6. Creating events
Events can be created by the organisers and by members you've allowed to Create events. There are two ways: quick add for the usual meeting and the wizard for anything special.
Quick add: an event in a few seconds
- Tap Events at the bottom. Or open your organisation's page and tap View events.
- Tap the round Add event button at the bottom right.
- If you run several organisations, choose the Organisation at the top.
- Under What?, write the title, for example ‘Choir rehearsal’.
- Under When?, choose the date, start and end. The end time is suggested from your default duration.
- Under Room, your default room is already selected. You can choose another one or No room.
- Tap Create.
Done. You can change everything else afterwards directly on the event (see chapter 7).
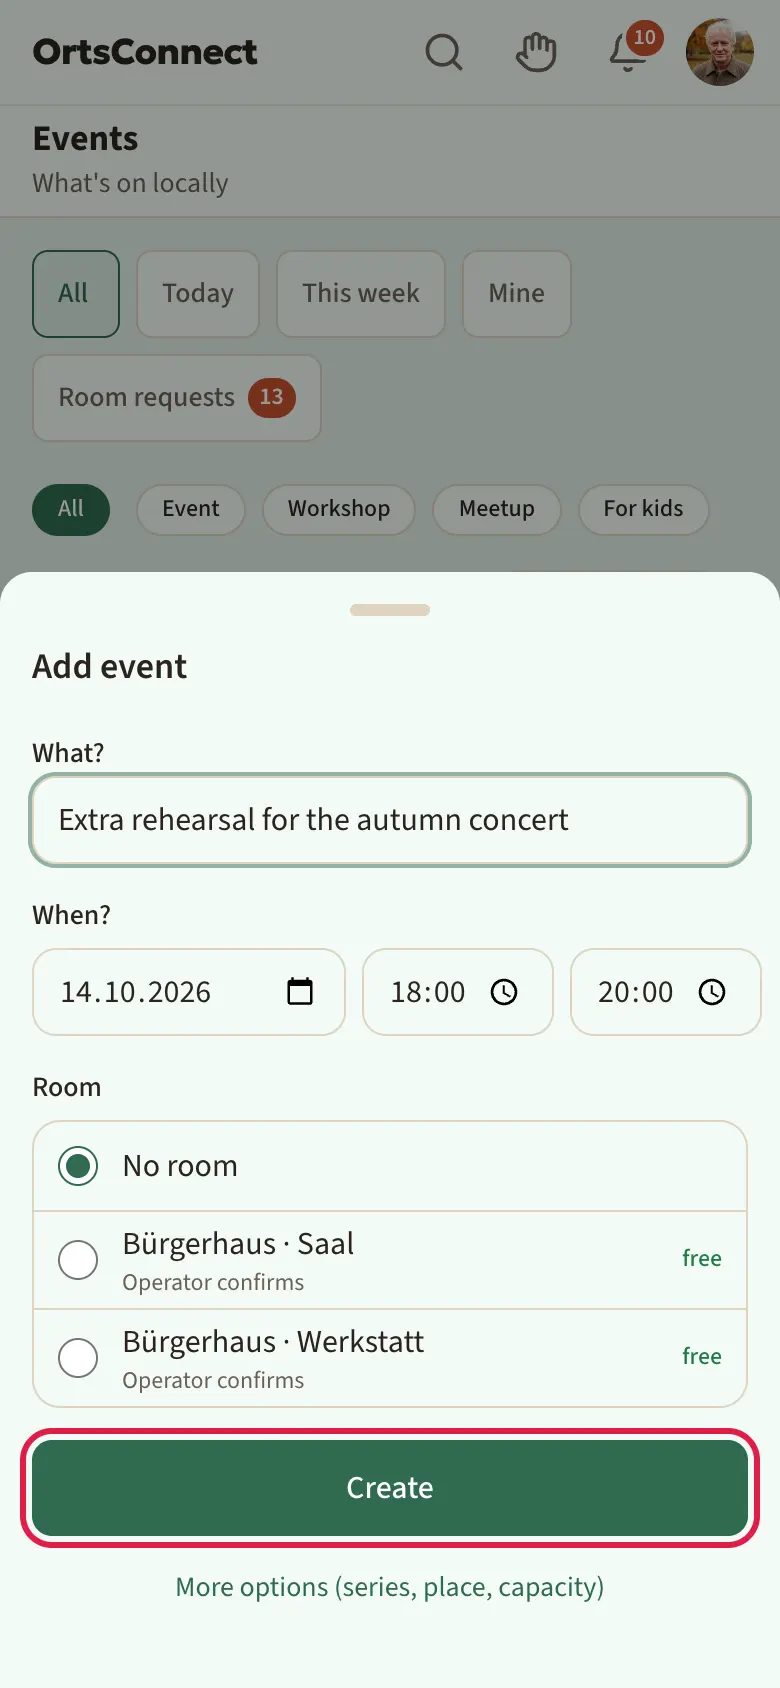
Understanding the room list
The room list shows for each room whether it's free at the time you've chosen:
- free: the room is available.
- requested: someone else has already requested it, but it isn't confirmed yet.
- booked or closed: the room can't be chosen.
- outside opening hours: the place is actually closed at that time.
Below that it says how booking works:
- booked instantly: the room is firmly yours straight away.
- Operator confirms: the place's operator first has to confirm the request.
If you change the time, the list updates by itself.
Good to know: If a room is booked, nothing at all is created. Choose a different time or a different room.
What happens with ‘Operator confirms’?
The event is listed with the note Room requested. Until it's confirmed, only your organisation's members can see it. As soon as the operator confirms, the event becomes visible to everyone allowed to see it according to its visibility.
If the operator declines or gives the room to someone else, the event is automatically cancelled. You and everyone who has already booked will be told.
How operators handle a room request is explained in the Handbook for places and businesses.
The wizard: series, place and more
For regular meetings, events without a room or with a limit on participants, use the wizard.
- Open quick add as described above.
- At the bottom, tap More options (series, place, capacity).
- The wizard has three steps.
Step 1: What & when
- Enter the Title.
- Choose the Type: Meetup, Workshop, Event or Internal.
- Choose the date, start and end.
- Under Repeat, choose whether the event is One-off or repeats (see the next section).
- If needed, write a Description.
- Tap Next.
Step 2: Where & who
- If you run several organisations, choose the Organisation.
- Under Place, choose:
- Book a room: you choose a room from the room list.
- Meeting point without a room: under Place you only choose the place, for example a square or a café.
- No fixed place: for example for outings or online meetings.
- Under Extra info (e.g. entrance by the car park) you can describe more precisely where to meet.
- For a video meeting, tick Online event and paste in the link.
- Under Capacity, enter how many places there are. Empty means unlimited.
- Choose the Visibility: Public (everyone, even without an account), Signed-in users or Organisation members only. What's preselected is what you've set under New events public by default (chapter 3).
- Tap Next.
Step 3: Review
Look at the summary and tap Add event.
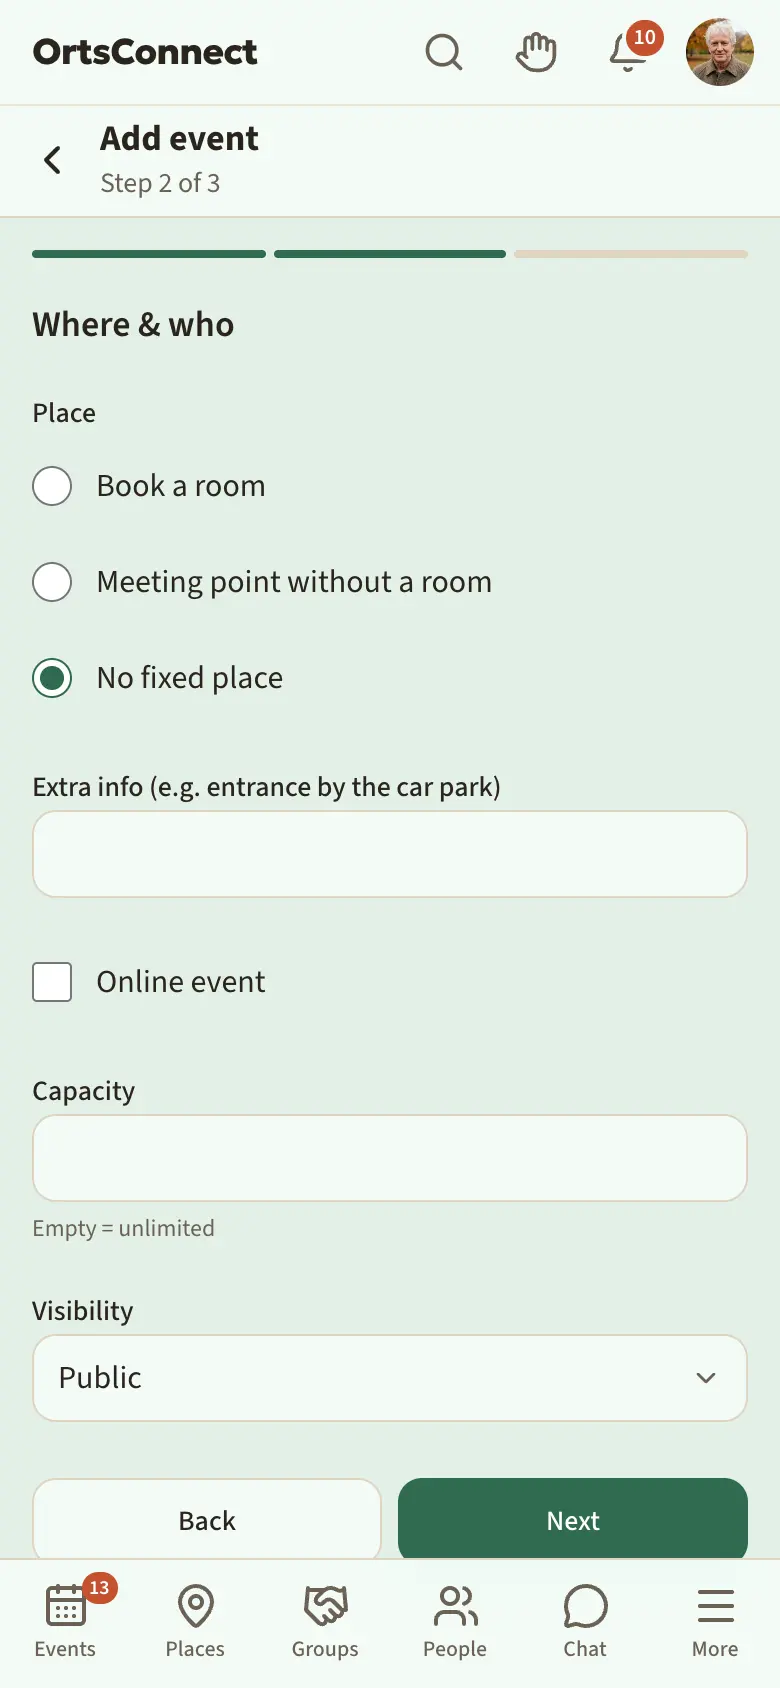
Good to know: Members with permission to Create events don't book rooms. They choose Meeting point without a room or No fixed place.
Series: regular events
Under Repeat you have these options:
- Daily, Weekly or Monthly: under Every, enter the interval, for example ‘Every 2 weeks’. For Weekly, tap the days of the week under On these days, for example Tue and Thu.
- Under End, choose Ongoing or Ends on …. With Ends on … you enter the last day of the series. With Ongoing, the next 26 weeks are always in the calendar and the app extends the series every night. You can end such a series later by cancelling an event with This and all following.
- Several dates: for events without a fixed rhythm. Tap Add day and choose a date each time. All days have the same time.
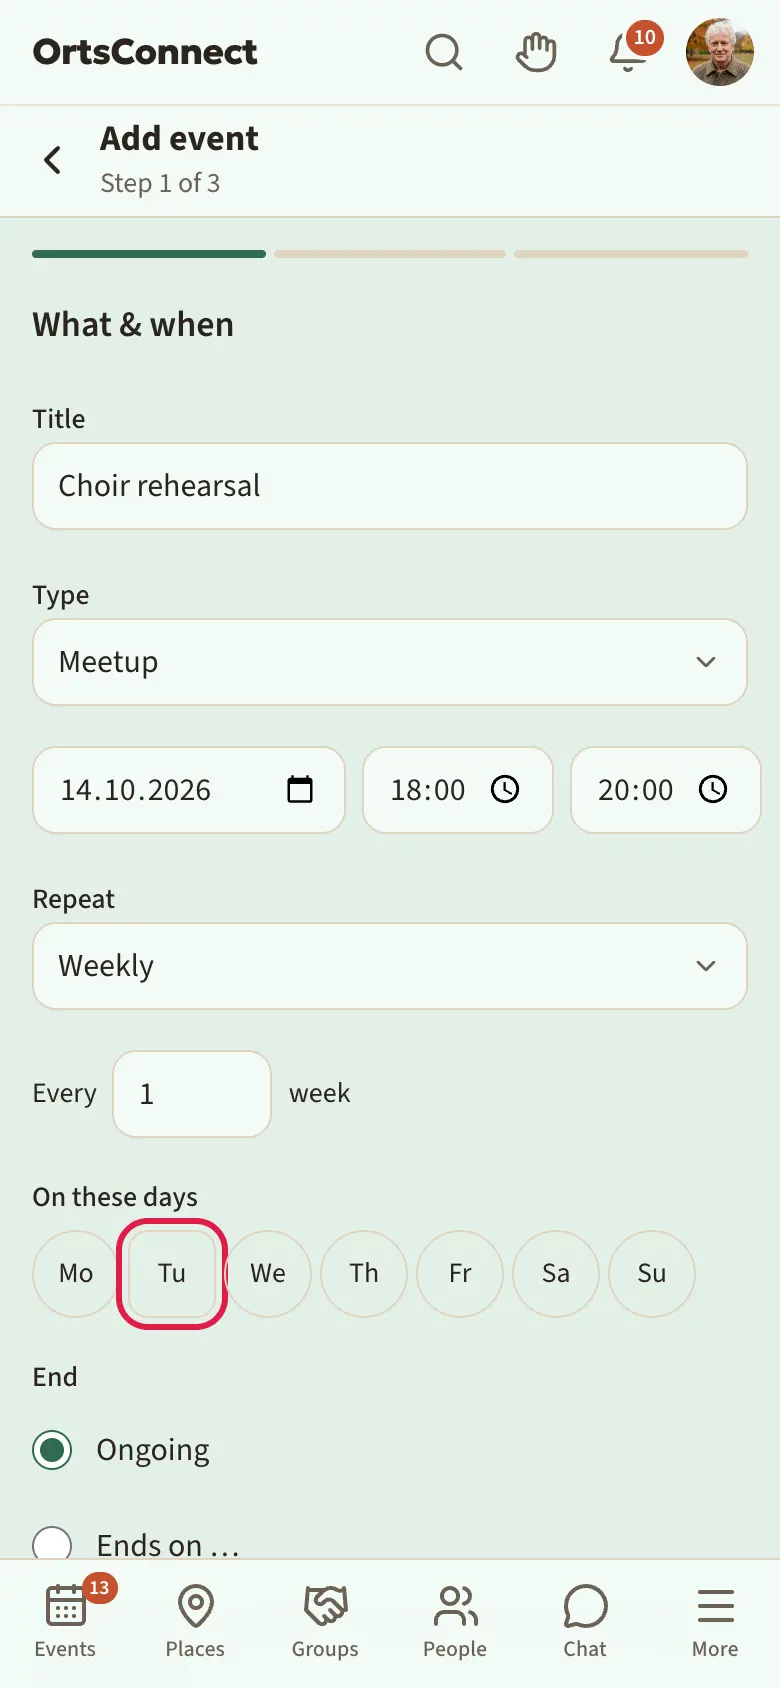
‘Room to follow’: events far in the future
Many places only let you book rooms a certain time in advance, for example only a few weeks. With a long series, some events fall beyond that.
These events are created all the same. They show the note Room to follow. As soon as the event moves into the permitted period, the app requests the room by itself. You don't need to do anything.
If the room is no longer available by then, this one event is cancelled, and everyone booked will be told.
Tip: With long series, check your events' room booking now and then. As an organiser, you see at the top of every event page how things stand with the room: Room requested, Room confirmed, Room to follow or Room declined.
7. Editing, copying and cancelling events
Changing things directly on the event
There's no separate edit mode. As an organiser, you simply tap what you want to change.
- Open the event.
- Tap the title (there's a pencil next to it), the date and time, the Where section, the capacity or the description. If there's no description, tap + Description.
- A window opens at the bottom, for the Where section for example Place & room. Change the detail.
- Tap Save.
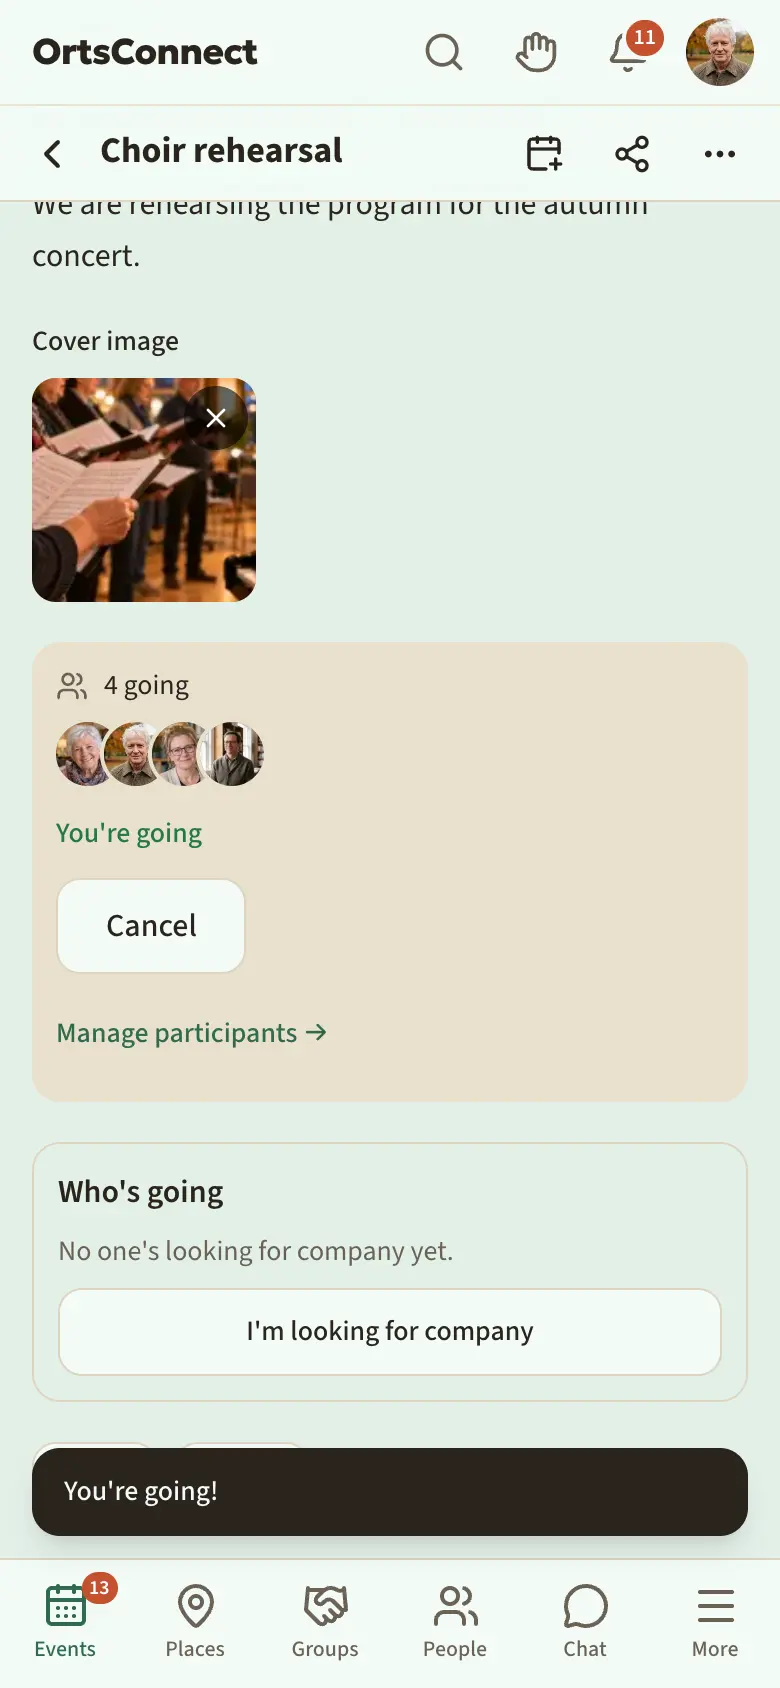
Further down the event page you'll find two small buttons: the first shows the current visibility (for example Public). Use it to change visibility and type. The second is called Photos (see chapter 11).
If you change the time or place, everyone who has booked gets the notification Event changed.
Good to know: The app takes some events from your community's events calendar. If the calendar names you as the organiser, these events appear under your organisation. Time, place and cancellations still come from the calendar, so change them there. The calendar doesn't overwrite text you've changed yourselves on the event.
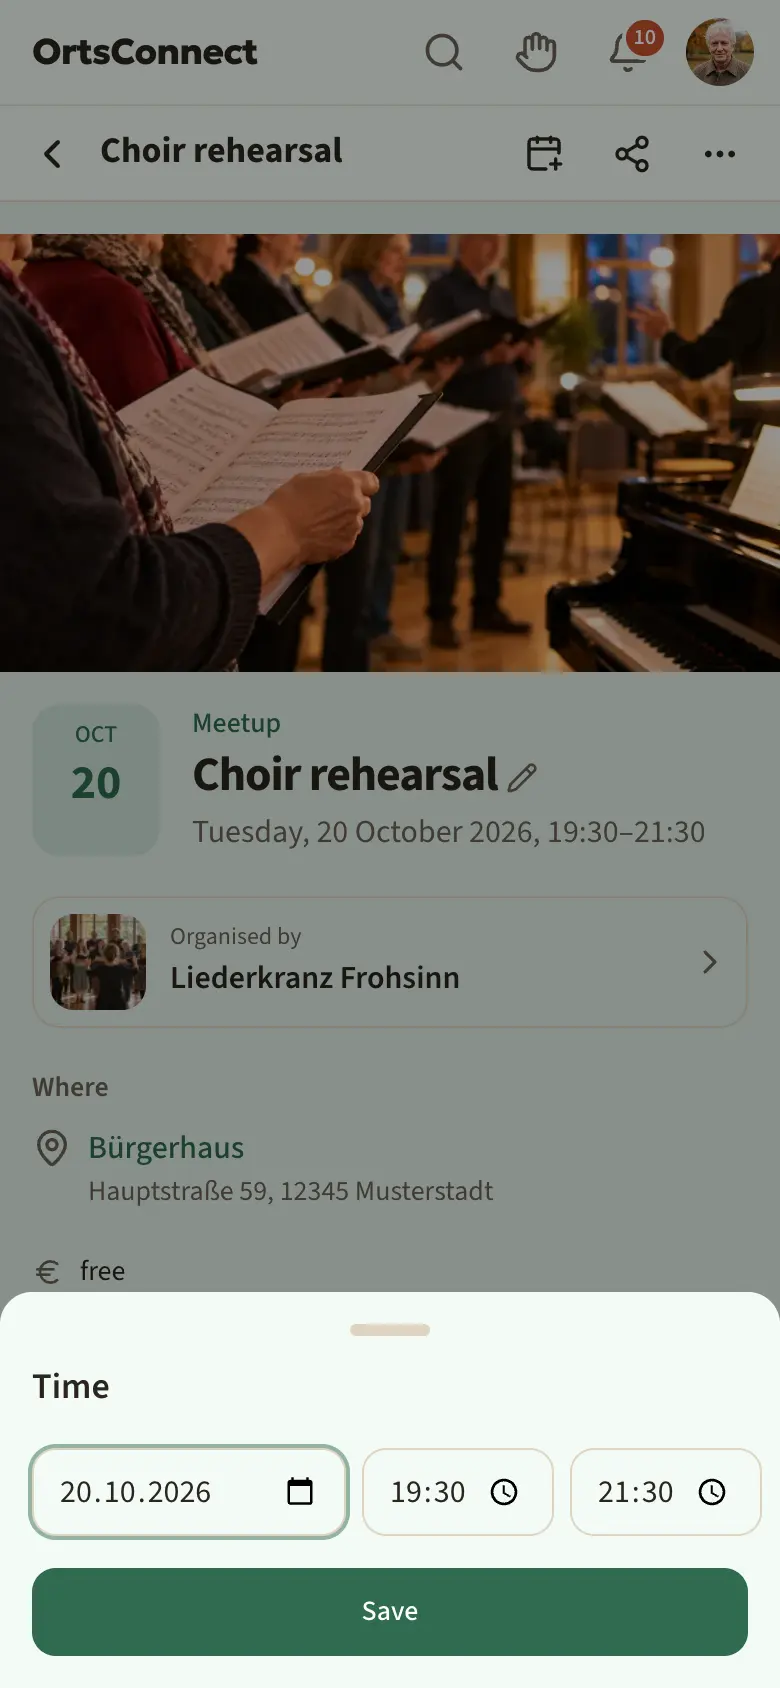
For series: only this one or all following?
If the event belongs to a series, the window asks you What should change?:
- This event only: for example because rehearsal starts later just this once.
- This and all following: for example because from now on you always rehearse on Wednesdays.
Setting up booking
Tap the box with the number of bookings. In the Booking window you set:
- Capacity: number of places; empty means unlimited.
- Waiting list when full: anyone who's too late goes on the waiting list and moves up automatically.
- Tickets with QR code: every booking gets a ticket with a code (see chapter 9).
- People per booking: how many people someone may book at once, for example a family.
- Booking opens and Booking closes: the period during which people can book.
- Cancel up to (hours before, empty = any time): after that, participants can no longer cancel by themselves.
- Cancel if too few have booked 24 h before: the event is automatically cancelled if fewer than Minimum bookings come together.
Tap Save.
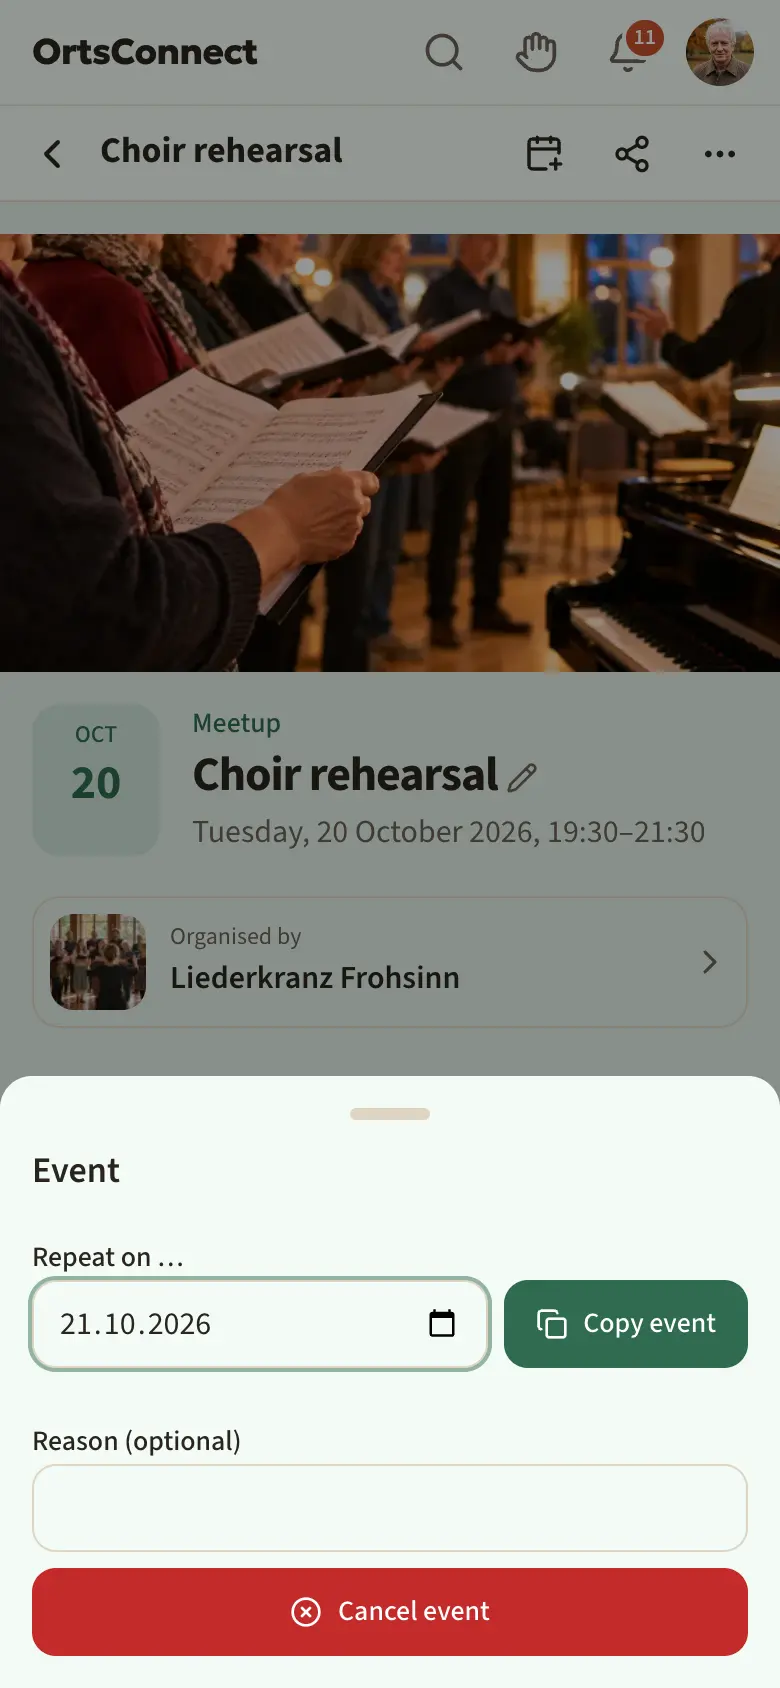
Copying an event: ‘Repeat on …’
- Open the event.
- Tap the three dots at the top right of the page header.
- Under Repeat on …, choose the new date.
- Tap Copy event.
The new event takes over everything, including the room. If the room is booked on that day, you'll see a message.
Cancelling an event
- Open the event.
- Tap the three dots at the top right.
- If needed, enter a Reason (optional), for example ‘Organiser ill’.
- If the event belongs to a series, choose This event only or This and all following.
- Tap Cancel event.
Everyone booked immediately gets the notification Event cancelled with your reason.
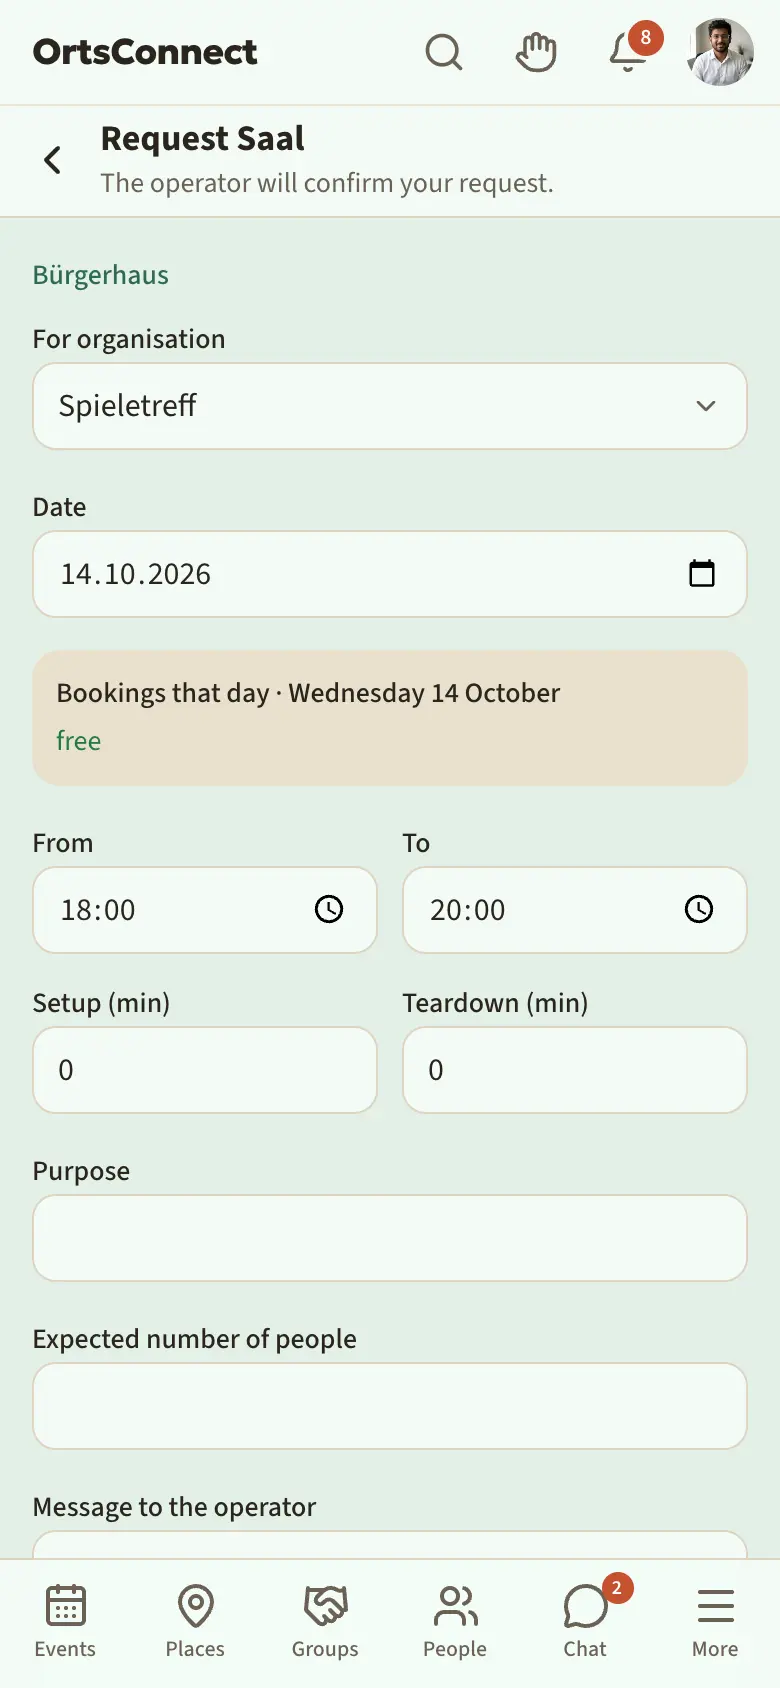
8. Requesting a room without an event
Sometimes you need a room without it becoming an event for everyone, for example for a committee evening or for setting up.
- Tap Places at the bottom and open the place.
- Tap the room you want. Under Occupancy you see when it's free this week. Use the arrows to go from week to week.
- Tap Request room.
- Under For organisation, choose your organisation.
- Choose the Date. Below it you see the Bookings that day.
- Enter From and To. If you need time for setting up or clearing away, enter it under Setup (min) and Teardown (min).
- Under Purpose, write what you need the room for.
- If needed, enter the Expected number of people and a Message to the operator.
- Tap Send request. If it says Book now, the room is booked straight away.
For a request, you'll be told as soon as the operator confirms or declines.
You see your requests and bookings on the room page under Your bookings. There you can withdraw them with Cancel booking.
Good to know: If a room booking that belongs to an event is cancelled, the event is cancelled too. If you only want to change the room, change it on the event under Place & room instead.
Tip: The room page also has the Add an event here button. It opens quick add with this room.
9. Bookings, participants and check-in
How members book an event is explained in the Handbook for members. This is about how you keep track as an organiser.
Opening the participant list
- Open the event.
- In the box with the number of bookings, tap Manage participants.
You'll see three lists:
- Going: everyone who's coming, with the number of places taken. If the capacity has been exceeded, it says Over capacity.
- Waiting list: in the order in which people move up. If someone shows Offer pending, a place has become free. The person has 24 hours to accept it. Otherwise the next person moves up.
- Cancelled / no-show.
If someone has signed up their child, the name is followed by, for example, ‘with Lena (8)’.
For every new booking, your organisation's organisers get the notification New booking, and for a new place on the waiting list New on the waiting list. The person themselves gets a confirmation, with the ticket code for tickets. 48 hours before the event you also get an overview with the number of bookings and people waiting.
Tip: If the notifications get too much, set the Events area to Digest, for example, in the avatar menu under Settings › Notifications.
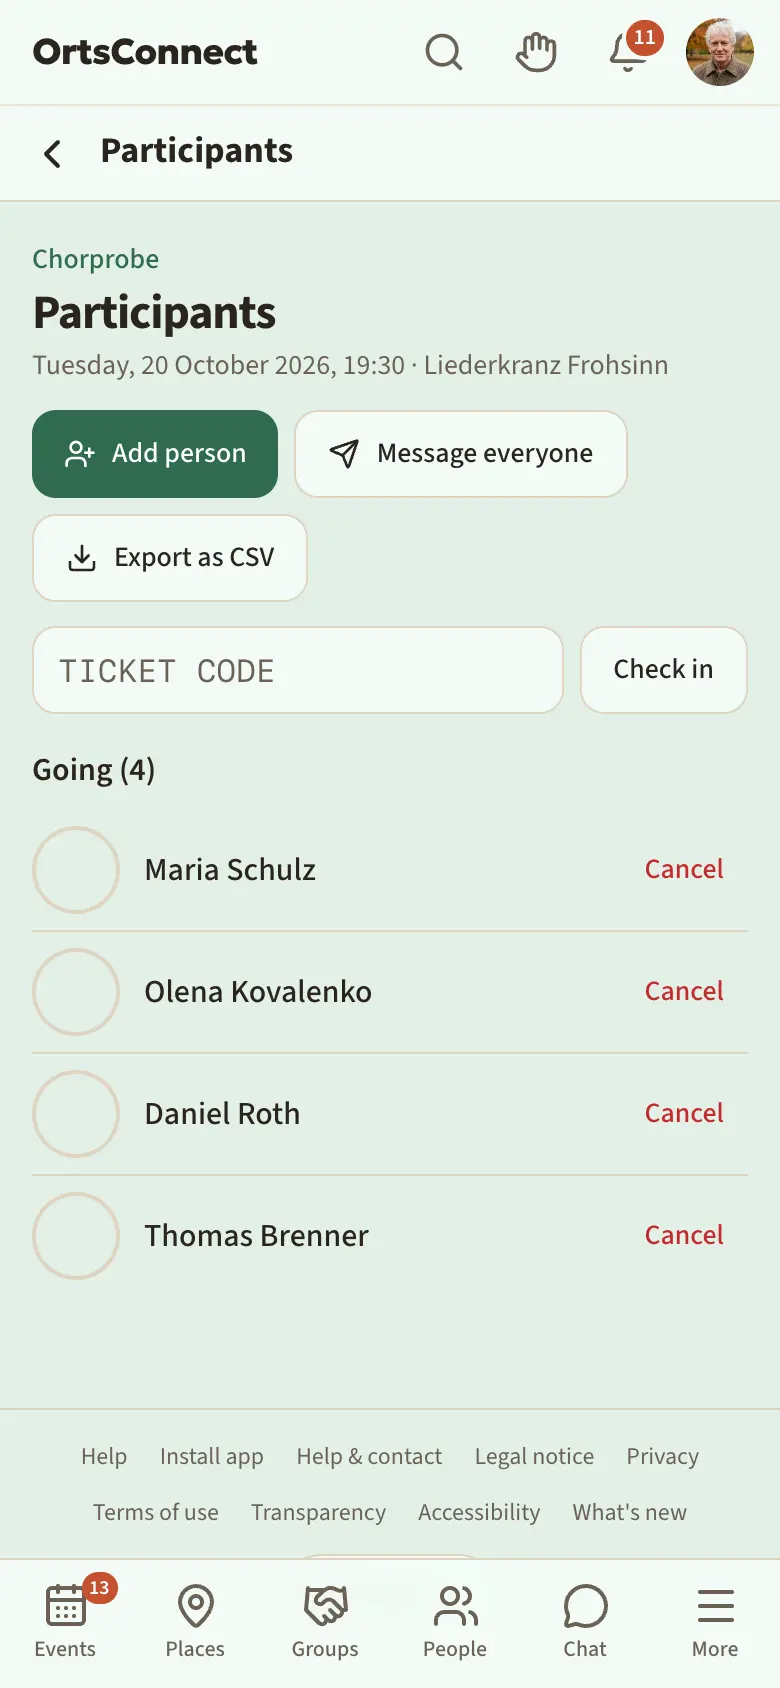
Adding people yourself
Not everyone books themselves. You can add people directly:
- Tap Add person.
- Search for names in the Search members field and tick them. Or tap Everyone in the organisation or Participants from last time.
- For someone without an account, such as a grandma at the children's course, enter a Guest name (no account).
- Tap Add.
Members you add get the message ‘You've been added’. They can remove themselves again. You may also add people beyond the capacity.
Good to know: You can only add members of your organisation, not other users of the app.
Message everyone
Tap Message everyone, write your text (500 characters at most) and tap Send. Everyone who has booked gets the message, for example ‘Please bring indoor shoes’.
Check-in: who's here?
At the event, simply tap the round circle in front of the name in the Going list. It turns green and the person is marked as Present. Tap again to undo it.
If you use tickets, you can also type the Ticket code into the field at the top and tap Check in.
After the event, tap Mark no-shows. Then everyone who wasn't checked in is listed under Cancelled / no-show.
With Cancel next to a name you take a person off the list.
Tickets
Tickets are optional. Turn them on for the event under Booking with Tickets with QR code. Then every booking gets a code. Participants find their ticket in the app under My tickets and show it at the entrance.
Exporting the list
With Export as CSV you download the participant list as a file. You can open the file in a spreadsheet app, for example.
10. Paid events and payments
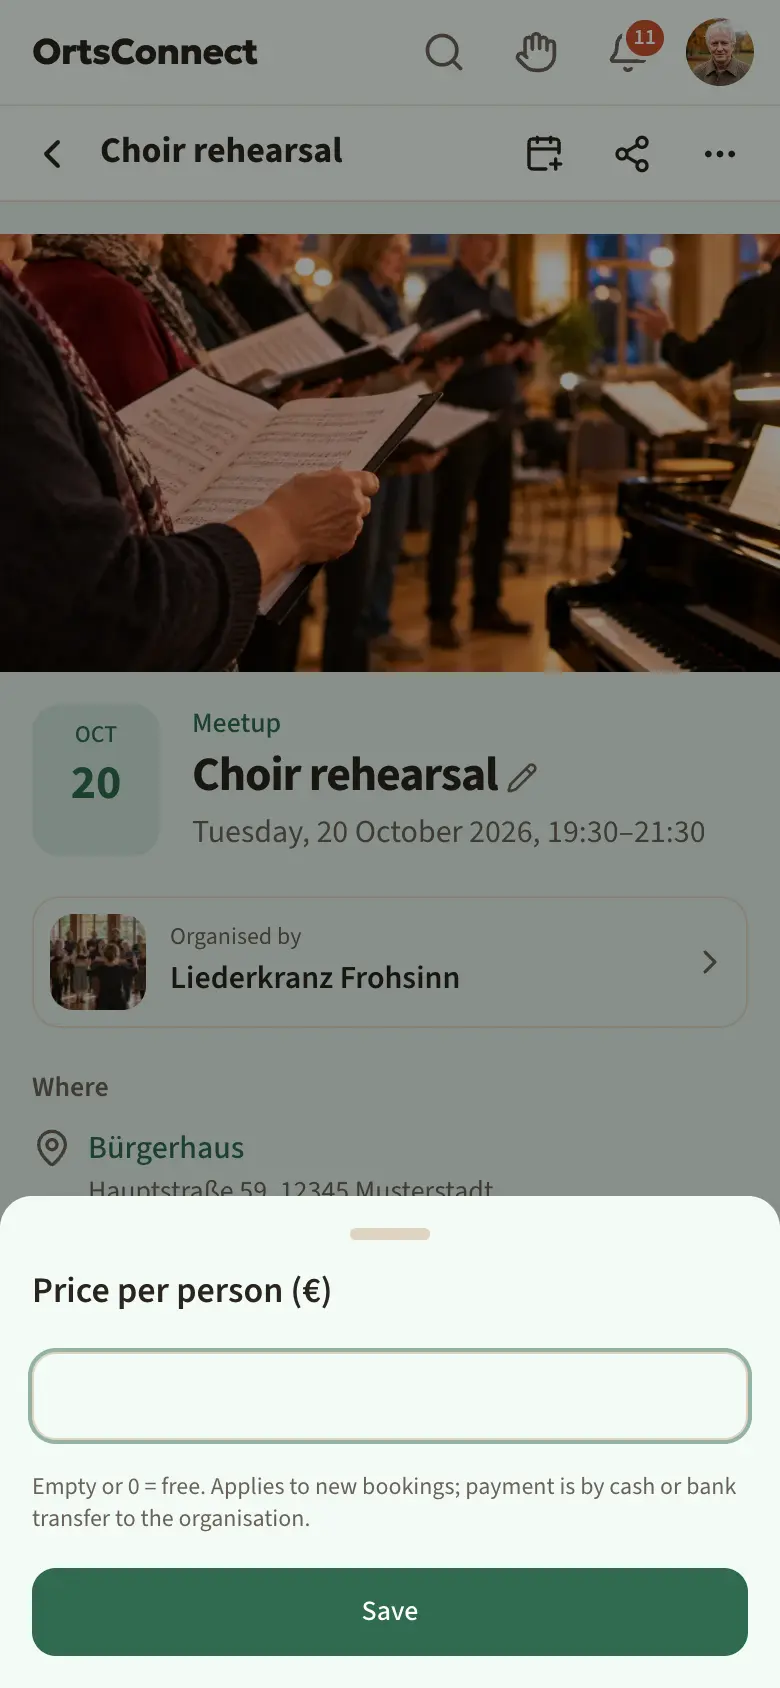
Setting a price
- Open the event.
- Tap the line with the euro sign. For free events it says free.
- Under Price per person (€), enter the amount, for example 12.50.
- Tap Save.
Empty or 0 means free. A new price only applies to new bookings.
How participants pay
Anyone who books has their place secured straight away and then chooses how to pay:
Your community decides which payment methods are available. Cash on the spot always works, Bank transfer and PayPal only if they're switched on.
- Cash on the spot: the person pays at the event. You confirm it at check-in.
- Bank transfer: the person transfers the money to your bank account. The payment number serves as the payment reference. The place stays reserved for a few days. If the money doesn't arrive, the person gets a reminder, and after that the booking is cancelled so someone else can move up.
- PayPal: if it's set up in your community or your organisation has added its own PayPal account. PayPal payments are confirmed automatically.
Good to know: People you add yourself via Add person don't get a payment request. You then sort out the money directly with the person.
Confirming cash at check-in
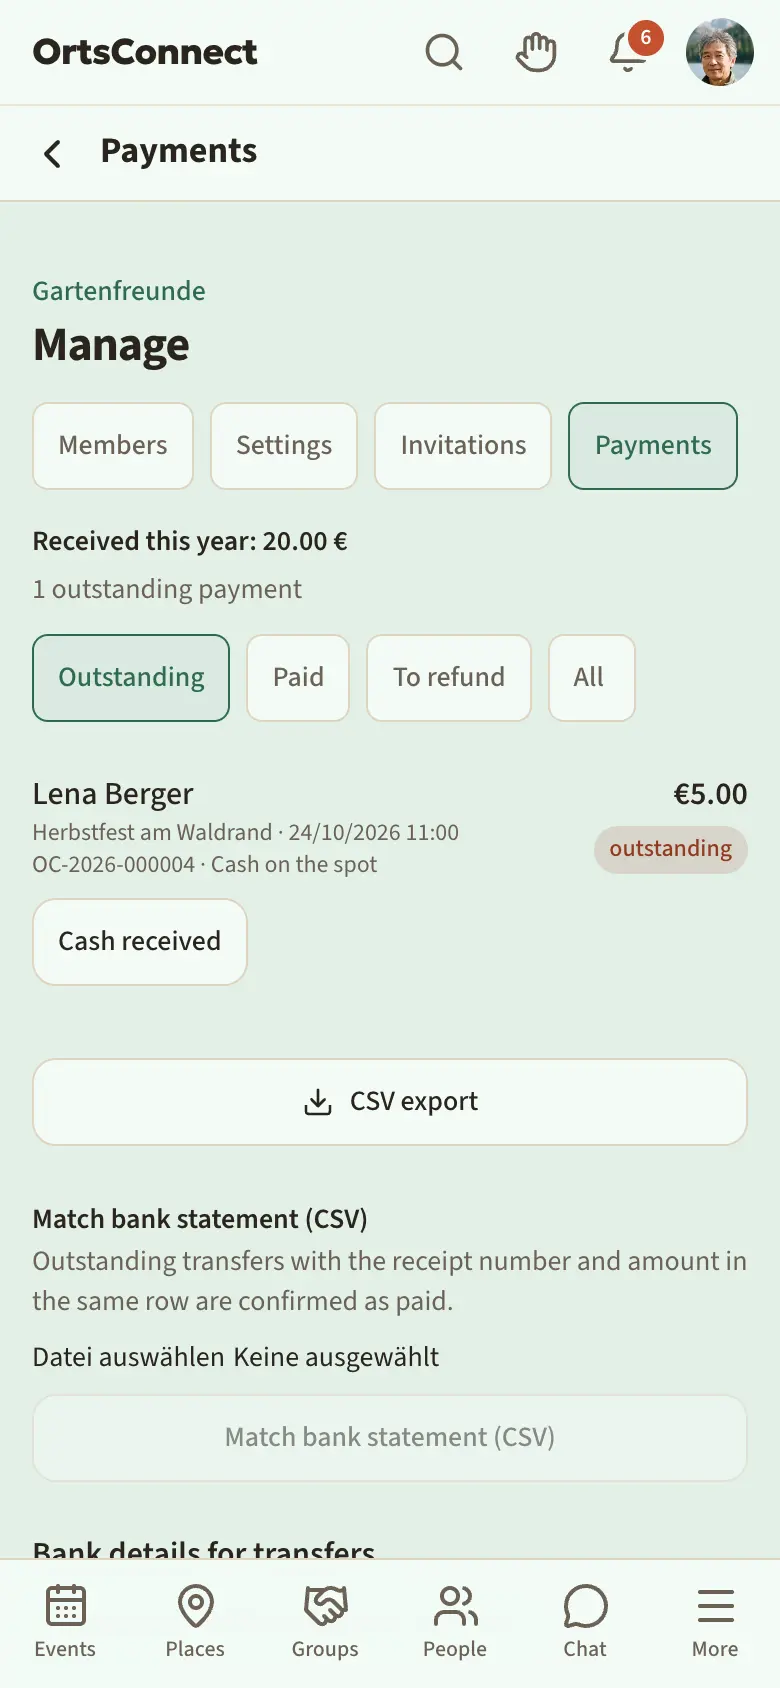
In the participant list, if a payment is outstanding, there's a Cash received button next to the name. Tap it as soon as you have the money. The payment is then confirmed and a receipt is created.
The ‘Payments’ page
Under Manage › Payments you see all your organisation's payments. Members with the Manage payments task open the same page via the Payments button on your page. They don't see the section for bank details and PayPal there. At the top it shows how much you've taken this year and how many payments are outstanding.
Use the round buttons to filter: Outstanding, Paid, To refund and All.
For outstanding payments you'll find the buttons Cash received and, for bank transfers, Transfer received.
Matching a bank statement
Instead of confirming each transfer individually, you can upload a bank statement:
- Download the bank statement from your bank as a CSV file.
- Choose the file under Match bank statement (CSV).
- Tap Match bank statement (CSV).
All outstanding transfers where the receipt number and amount appear in the same line are confirmed as paid.
Refunds
If a paid event is cancelled, the payment appears under To refund.
- On the payment, tap Refunded.
- Write down how you refunded it, for example ‘cash back’ or ‘bank transfer on 12.10.’.
- Tap Refunded.
The refund is then recorded. Any booking that still exists is cancelled at the same time.
Export
With CSV export you download all payments as a file, for example for the audit of the accounts.
Adding bank details and PayPal
Only organisers can change these details.
- Open Manage › Payments and scroll down. If your community has switched on neither bank transfer nor PayPal, this section doesn't exist.
- Under Bank details for transfers, enter the Recipient and the IBAN. Without bank details, people can only pay in cash.
- If you want to use your own PayPal account, enter the PayPal client ID, the PayPal secret and the PayPal webhook ID under Own PayPal account. You'll find all three in the developer area of your PayPal account. The secret is stored encrypted and never shown again afterwards; if you want to keep it, simply leave the field empty the next time you save. The app shows you the Webhook address for PayPal; enter it at PayPal.
- Tap Save.
Tip: Participants can download their receipt as a PDF themselves. You don't have to write any receipts.
11. Photos at the event
From the start of an event, the event page has the View photos section. Participants can upload photos there.
Setting up photos
- Open the event.
- Tap the small Photos button.
- Leave Allow photos at the event ticked or untick it.
- Choose Visible to everyone or Participants only.
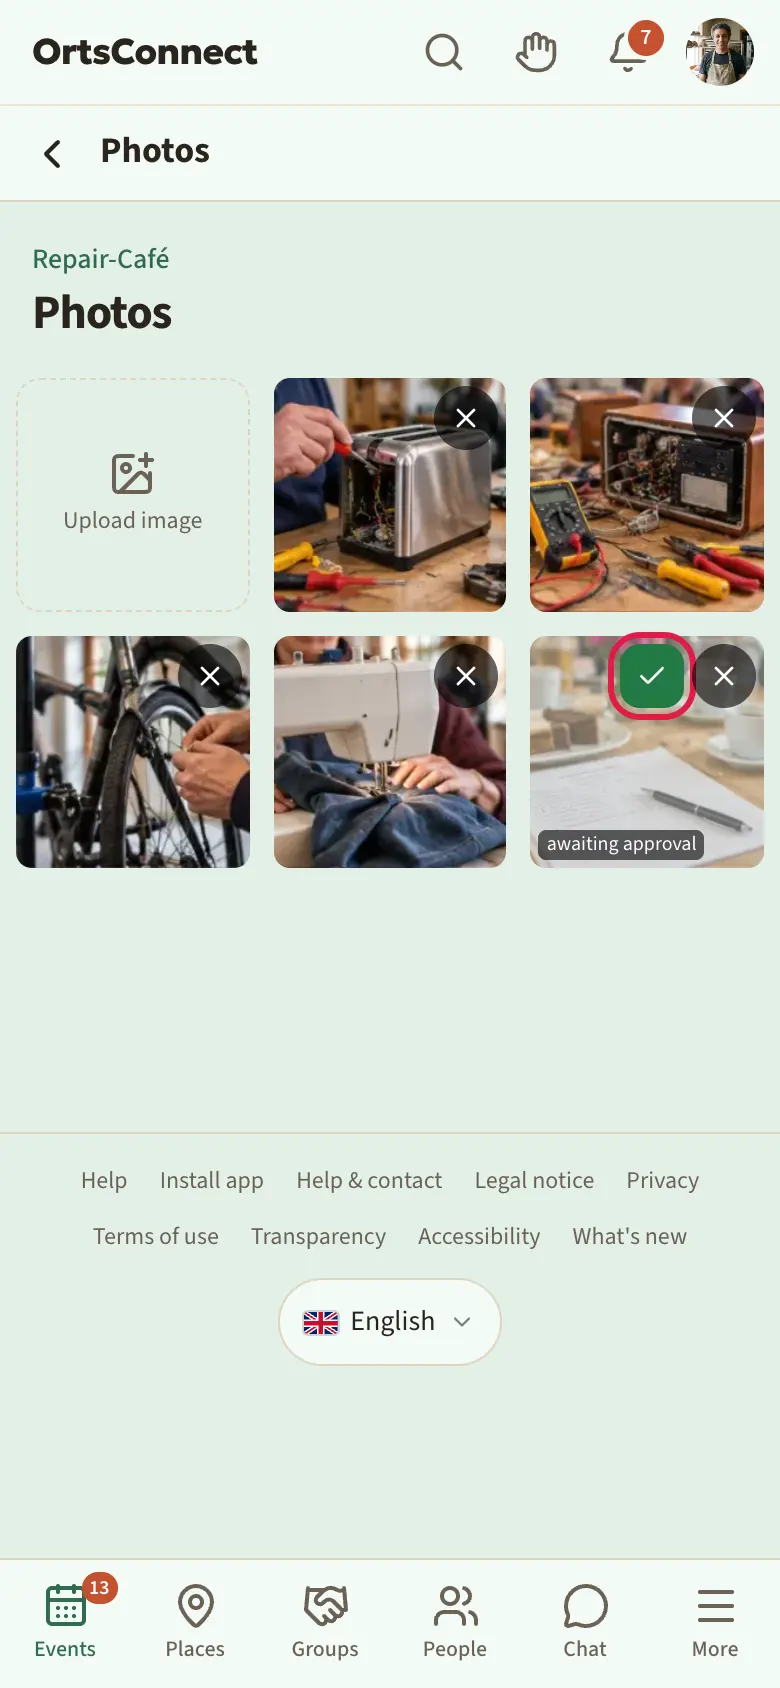
- If you want to look at every photo first, tick Show photos only after approval.
- Tap Save.
Approving and removing photos
If approval is switched on, new photos show awaiting approval. Tap the green tick (Approve) to show a photo, or the cross (Remove) to delete it.
This can be done by the organisers, your organisation's moderators and members with permission to Approve photos.
12. Followers and notifications
Members and followers
As well as members, your organisation also has followers. These are people who follow you without being members. They tap the star (Follow) at the top of your page. If they also turn on the bell, they get news as a push notification too.
What followers get:
- Posts you publish as Public (followers too).
- New public events. For a series, only the first event. Events with a requested room only once the room is confirmed.
As an organiser, you only see how many people follow you, not who.
Tip: Point out your QR code on posters and flyers (chapter 3). Anyone who scans it lands on your page and can follow you with one tap.
What you get as an organiser
- New join request when someone wants to become a member.
- New booking or New on the waiting list when someone books one of your events (chapter 9). Only the organisers get this, not members with permission to Create events.
- New section requested when a group wants to belong to your club (chapter 3).
- Updates on room requests: confirmed, declined or given to someone else.
- An overview 48 hours before your events.
13. Keeping order in your own organisation
Your organisation's organisers and moderators work together to keep things friendly.
- Posts: you delete unsuitable posts with the bin symbol.
- Group chat: you can take out other people's disruptive messages with Remove for everyone (it then says ‘Removed by the group organisers’) and restrict the chat to announcements with Only organisers write (chapter 5).
- Photos: you approve or remove photos (chapter 11).
- Members: organisers can Remove or Ban people (chapter 4).
If someone reports a post, a photo or a chat message, the report goes to your community's moderators. They deal with it, including serious cases such as harassment.
Tip: Give the Moderator role to one or two reliable members. That way you don't have to keep an eye on everything on your own.
14. Deleting an organisation
If your club is dissolved or the group is no longer needed:
- Open Manage › Settings.
- Scroll right down.
- Tap Delete organisation.
- Read the note and tap Delete organisation again.
The organisation disappears immediately and is permanently deleted after 90 days.
Good to know: If you just don't want to be an organiser any more, you don't need to delete anything. Simply hand over the organiser role to someone else (chapter 4).
15. Extra features
Some features are only available if they're switched on in your community.
Point donations
If points are switched on in your community, you'll find the Accept point donations tick box under Manage › Settings in the Events section. The Donate points button then appears on your page, and members of the community can give you points.